
The 4th Armoured Brigade
Engagements - 1943
During 1943 the 4th Armoured Brigade was involved in the following battles and campaigns. These include To Tripoli and the Push To Tunis (including the Mareth Line), Operation Husky, - The Invasion of Sicily (including 3rd County of London Yeomanry's advance, 44th Royal Tank Regiment's advance, Operation Blackcock) and Italy (including the Battles for Sangro River and later the Moro River). For information on the engagements if fought as part of 7th Armoured Division up to the end of the North African campaign, please go to the main 7th Armoured Division, Engagements 1943 page.To Tripoli and the Push To Tunis - January to May 1943
On the morning of 15th January 1943, 8th Armoured Brigade (under the command of 7th Armoured Division) crossed the road from Gheddahia to Bu Ngem, the New Zealand Division coming up on their left. The Brigade then crossed the New Zealand Division to our traditional station on the open left flank, remaining under command of 7th Armoured Division, although the New Zealand Division was between it and the rest of the Division. The objective was Beni Ulid and the route was a narrow defile through the broken desert, previously reconnoitred by the LRDG. It was atrocious going and progress slow. It was not till the afternoon of 7th January that the Brigade made contact with the enemy east of Beni Ulid, which 8th Armoured Brigade were beginning to outflank from the north-east. Enemy vehicles were closely packed in the village and in the failing light 2nd Bn KRRC, supported by 3rd RHA, closed up on the tail of the column and caused much damage, continuing to shoot it up after dark. The enemy got away what they could during the night, but when the Brigade entered the village in the morning collected a fair haul of prisoners and found a large number of destroyed or abandoned vehicles including thirteen Italian M-13 tanks. The Brigade could not continue up the main road to Tarhuna as the bridge was blown and there was no possible deviation, so it set off on a very indifferent track west of the main road, hoping to reach the track from Tarhuna to Garian about half way between the two. Every Arab assured the Brigade that the country was impassable, to all but donkeys and camels. It was not impassable, but it was the nearest thing to it imaginable. To add to the trials imposed by the frightful difficulties of the rocky, hilly country intersected by sheer wadis, we were subject to continuous attacks by Stukas and Messerschmidts. However the Brigade struggled through somehow and were rewarded by KDG finding what everyone was looking for, a way down the escarpment west of Tarhuna. Click here to see the Brigade Order Of Battle at this time
On 20th January 1943 the King's Dragoon Guards (KDG) went down the escarpment into the sea of soft sand below, while the Royals turned west along the track to Garian. KDG met some German tanks south of Azizia which might have proved troublesome, as their armoured cars were all getting stuck. On the 21st the rest of the brigade, less the Royals and one battery of 3rd RHA, who had met an enemy rearguard east of Garian, descended the escarpment, the Scots Greys leading the New Zealand Division following the Brigade and coming up on its right. While others raced for Tripoli, the Brigade turned west above and below the escarpment.
On 22nd January the Royals entered Garian, welcomed by the Italians as protection against the Arabs: there they joined hands the following day with General Leclerc's Free French force, which had come all the way from Lake Chad. While the rest of the division was celebrating the capture of Tripoli, the Brigade pushed further west to Jefren, communication with the Royals being made difficult by the fact that the roads up the escarpment at Garian and Jefren were both blown. 4th Field Squadron RE mended the 'blow' in the road below Jefren and the Brigade was able to join forces again. Extended to its utmost limit the Brigade pushed further westwards, and on 2nd February crossed the frontier into Tunisia, the first troops of Eighth Army to do so. Here the Brigade found themselves up against old enemies, the German 3rd and 33rd Reconnaissance units, and continued to have very considerable trouble from the Luftwaffe.
At the end of January Brigadier Harvey left the Brigade to take over command of 8th Armoured Brigade and he was succeeded by Brigadier D. S. Newton King, DSO, who had for so long commanded the 4th South African Armoured Car Regiment and had more recently been second-in-command of 22nd Armoured Brigade.
Gradually the Brigade forced back the enemy's patrols to a close ring round Fourn Tatahouine. The rest of the division meanwhile was struggling with the salt marshes near El Assa: after a causeway had been built, Ben Gardane was captured on 15th February, and 12th Lancers quickly closed up to Medenine. Meanwhile the Brigade faced the problem of capturing Fourn Tatahouine, a hilly stronghold on the edge of the ridge of mountains running south-east from the Mareth Line. By a brilliantly conducted attack 2nd Bn KRRC captured the key position commanding the approach from the east and quickly cleared the village itself. The Brigade now began pushing up the narrow tracks into the mountains, and linked up with the rest of the division on its right south of Medenine. As the Brigade pushed the enemy back northwards, it opened up a route through the mountains and joined hands again with General Leclerc on the far side. Brigadier Newton King was now succeeded by Brigadier John Currie, DSO, MC, who had commanded 9th Armoured Brigade at El Alamein, before which he had commanded 2nd Armoured Brigade for a short time. At the beginning of March the Free French Flying Column, a small party of mobile troops which included a squadron of Crusader tanks, came under the Brigade's command.
The New Zealand Division, with the Greys still under their command, also arrived to take over the area of Medenine and the Brigade came under their command. On 6th March 1943 Rommel made his famous attack on Metameur and Medenine from the west. One column. struck south-east and was hotly engaged by the Free French Flying Column. By the end of the day it had been driven back to join the main body in its rout. After the battle the Brigade continued its difficult and novel task of mountain warfare. A Gurkha battalion came under its command from 4th Indian Division and soon made the mountains unpopular with the enemy. Before the Battle of Mareth began, the New Zealand Division with the Greys passed through us, by the mountain route the Brigade had opened up, to join General Leclerc west of the hills, and the Brigade came under command of 1st Armoured Division who had taken their place.
The Battle of Mareth opened on 21st March 1943 and by the 24th, it was clear that the 50th Division's attack at the north end of the line had failed. So 1st Armoured Division crossed the mountains to join the New Zealand Division south of El Hamma and 4th Indian Division took on the job of clearing the mountains. The Brigade returned to the command of 7th Armoured Division moving up to the area west of Medenine between 22nd Armoured Brigade and 4th Indian Division. The Brigade's final job in the Battle of Mareth was the capture of the precipitous foothills astride the main road to Toujane, which was brilliantly carried out by 2nd Bn KRRC; their attack, and that of 1st Bn The Rifle Brigade on their right, resulting in the capture of a large part of the Italian Pistoia Division. Meanwhile the New Zealand Division, with their faithful Royal Scots Greys, and 1st Armoured Division had inflicted a crushing defeat on the enemy at El Hamma and forced the Germans and Italians to pull back to the line at Wadi Akarit. The Brigade now moved up to near Gabes with 7th Armoured Division, but left the Division there to join 10 Corps.
The Brigade took no part in the battle of Akarit itself, which opened on 6th April, but followed 1st Armoured Division through and came out on their left, watching the open flank between them and the American 1st Armoured Division of First Army. The Brigade continued this task without incident as 1st Armoured Division advanced to La Fauconerie and Kairouan. At Kairouan The Brigade relieved 1st Armoured Division, who went to join First Army, and found ourselves between General Leclerc's Free French force on the Brigade's right and the 19th French Corps of General Giraud's forces on its left, a tricky situation. The Brigade continued the advance north capturing Pjebibina, and pushing the enemy back into the foothills to the north. It was an unpleasant position in open low ground, overlooked by mountains on all sides: enemy shelling was intense and accurate, causing many casualties. The Brigade took command of General Leclerc's force, coming under command of 7th Armoured Division later, when they moved up to Kairouan on 16th April. Between 20th and 27th Arpil the Brigade pushed the enemy further back still into the hills, 22nd Armoured Brigade coming up on its right near Djebel Fadeloun, while New Zealand Division were attacking Enfidaville and Takruna and 4th Indian Division scaling Djebel, Garci. By now the Brigade was wearing the 'Black Rat' (Jerboa) emblem instead of 7th Armoured Division's red Desert Rat one, with the main difference (apart from the colour) being that the 'Black Rat' had its tail over its head.
On 28th March 1943, the 7th Armoured Division and 4th Indian Division moved to join the First Army, and all further ideas of an attack on Eighth Army's front were abandoned. The Brigade then returned to the command of the New Zealand Division. and its only other moment of excitement between then and the end of the campaign in North Africa on 13th May, was the negotiation of the surrender of the Italian Army by General Messe to General Freyberg. The operator on the brigade command net picked up a message from General Messe, which was passed to General Freyberg. The Brigade then arranged a rendezvous for their representatives by the same means.
Alas the Brigade was not part of the triumphant entry into Tunis, but it could feel that it had contributed greatly to the victory in North Africa since its formation in Egypt three and a half years before. Until April 1943, the 4th Armoured Brigade had used the famous red 'Desert Rat' badge of 7th Armoured Division and had fought either as part of the Division or under its command for all this time, but this was now about to change.
Operation Husky - The Invasion of Sicily
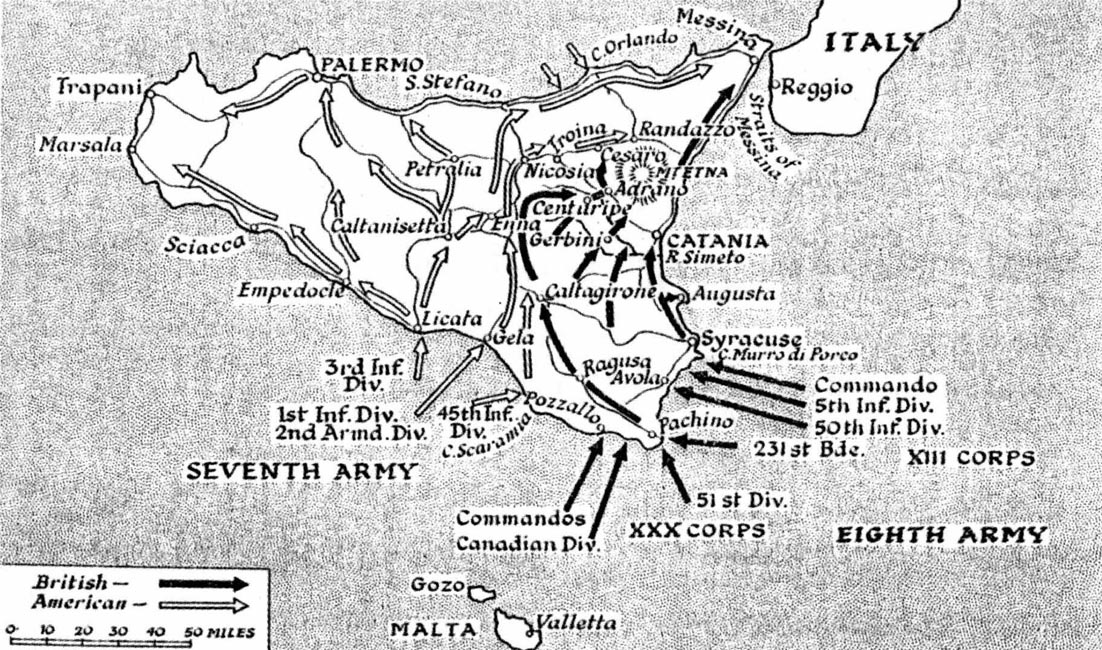
In the initial assault on Sicily on 9th July 1943, there were 3,000 ships and landing craft carrying between them 160,000 men, 14,000 vehicles, 1,800 guns and 600 tanks. Among these were 4th Armoured Brigade, who landed with 95 diesel Sherman tanks, which were preferable to the normal petrol ones as they did not catch fire so easily. The Brigade on consisted of two tank Regiments which were the veteran 44th RTR and the newly joined 3rd County of London Yeomanry (The Sharpshooters), plus 'A' Squadron of the Royal Dragoons. Brigadier John Currie with Brigade HQ had left Sfax, Tunisia, on 21st May and returned to the Nile Delta, in preparation of this Operation. On 1st June 1943, the old title 'Light' Armoured was dropped and the brigade became part of XIII Corps under Lieutenant-General Miles Dempsey. The brigades initial task in Operation Husky was to act as two independent tank regiments, with 3rd CLY (commanded by Lt-Col Geoffrey Willis) usually supporting 5th British Division, 44th RTR (commanded by Lt-Col E. D. Rash), the 50th (Northumberland) Division. After a peaceful sea journey starting from Port Said on 5th July, aboard HMS Bulolo and LSP Dilwara, they arrived off Sicily on the night of 9th/10th July. Brigade TAC HQ were with HQ XIII Corps, the rest of Brigade HQ following on D+28.
The allied forces for the invasion were to be the British 8th Army with XIII and XXX Corps consisting of four infantry divisions, part of 1st Airborne Division, 231st (Malta) Infantry Brigade, three commandos and 4th and 23rd Armoured Brigades, plus General Patton's 2nd US Corps, which consisted of three infantry and one armoured division, part of 82nd Airborne and a battalion of Commando Rangers. The Axis garrison in Sicily initially consisted of two German (one of which was armoured), four Italian infantry divisions and six low-grade Italian coastal divisions.
Models of the landing area had been prepared and thirty-seven different maps issued to each vehicle. The weather was rough on the night of the 9th/10th. As the ships began to roll, the enthusiasm and keenness of many began to wane.
Airborne troops had been dropped just west of Syracuse to seize the Ponte Grande, an important bridge over the Anapo River. Many paratroops had been dropped too early and had been drowned. Casualties had been heavy and the gruesome wrecks of gliders on the coast were very depressing. Although present during the invasion 4th Armoured Brigade HQ were not actually controlling the two regiments until 21st July 1943, what follows are two separate accounts of their time on Sicily, plus a summary of the Brigade's movements, too. Click here to see the Brigade Order Of Battle at this time
3rd County of London Yeomanry (The Sharpshooters) in Sicily: As British Spitfires patrolled overhead and with the Monitor HMS Erebus dueling with the shore batteries, the regiments landing area was identified by means of the water tower at Cassibile. The Royal Navy ferried the regiment ashore and 'A' and 'B' Squadrons were soon in action before Syracuse, dealing with the barracks and supporting 2nd Bn Northamptonshires. In the distance the regiment could see Mount Etna, but as 'B' Squadron advanced German Panzer Grenadiers, from the Hermann Goering Division ambushed the column and put five Shermans out of action. The next day, while supporting 2nd Bn. Royal Scots Fusiliers, the nine remaining 'B' Squadron tanks went through Priolo, but were held up by a natural tank obstacle. Elsewhere, Brigadier Tarleton, commanding 17th Infantry Brigade of 5th Division, asked for help to get the 6th Seaforth Highlanders into Augusta that night, so 'B' Squadron fired at every pillbox or buildings seen in the half light until 04:00 hrs in the morning of 13th July when the last vital crossroads was taken. The Royal Scots Fusiliers went in with the bayonet before dawn and took Augusta, but 3rd CLY lost a troop commander to a 2.8cm 'needle' anti-tank gun.
Meanwhile, 'C' Squadron supported 24th Cameronians in the advance into Floridia, then onto Taverna and Solarino. Doing these action an 88mm anti-tank gun knocked out two Shermans, but the 2nd Bn. The Royal Inniskilling Fusiliers and 2nd Bn. Wiltshire Regiment (Duke of Edinburgh's) found Solarino deserted. 'A' Squadron supported 15th Brigade and the 1st Bn. Kings Own Yorkshire Light Infantry near Villasmundo, where a strong counter-attack by Anti-Tanks guns and mortars from both flanks, knocked six out of seven tanks, of which four were completely destroyed by fire and two subsequently recovered. It was learnt later that 15th Brigade put in a counter-attack and recaptured the lost ground. The four 'brewed up' CLY Shermans caused twelve casualties to 'A' Squadron and the lesson was learnt that in close country the tanks needed very close infantry support, totally unlike the desert tactics.
With the bridgehead now established a joint armour/infantry advance on Catania, with its port and airfields, was a prime objective. On 13th July 1943, 3rd CLY lead 4th Armoured and 15th Infantry Brigade through Villasmundo, Carlentini, Lentini, capture the Primosole bridge spanning the River Simeto and on to Catania. At 22:30 an Airborne Brigade was dropped in the area Primosole bridge with the object of capturing it and holding till relieved by 15th Infantry Brigade and 3rd CLY. The essential feature of the plan was speed and movement. It was not clear whether Villasmundo was free of enemy and 'B' Squadron was ordered to move during the night 13th/14th July from Augusta to Villasmundo with one Lorried Infantry Company of 2nd Bn. Cameronian Highlanders, to attempt to capture it by first light. At approx 15:30 'B' Squadron arrived at Villasmundo having met no opposition anywhere.
Although the first two villages were not defended, and with the Germans having evacuated Carlentini, the Korner Regiment had left behind it a strong screen of Anti-Tanks guns, and the Luftwaffe out in force, with the intent of defending the vital river bridge. On the 14th the Sharpshooters knocked out six well-sited 88mm guns, but several Shermans shed their tracks on the rough, hard going. 'A' Squadron was heavily strafed and bombed while crossing the river at but no damage was done, however, 3 tanks shed their tracks. A' Squadron then pushed on and contacted 50th Division. At 17:30 the Regiment was replenished by A1 Echelon on top of the high ground, whilst this was taking place 44th RTR passed through. The Regiment then made a wide detour before rejoining the main road and continued on to Lentini. Considerable delay was experienced whilst passing through Lentini on account of traffic jams and the Regiment arrived at the leaguer area at approx 22:00, but 'A' Squadron did not arrive until 03:30, on 15th July.
At first light on 15th July 1944, the Regiment advanced to area that overlooked the plain of Catania. Here various targets were engaged by 'A' and 'C' Squadrons in the plain throughout the morning. 'C' Squadron was then ordered to send two Troops to recce two river crossings which were reported clear and the railway bridge at second crossing was intact. During this patrol 'C' Squadron captured eight Italian prisoners of 135th Coast Defence Regiment. Several guns were silenced in the plain of Catania during the morning by British artillery fire ably assisted by the monitor HMS EREBUS and county class cruisers. At 13:30 'A' Squadron took over positions from 44th RTR South of Primosole bridge and throughout the afternoon they were engaged enemy with machine gun fire and HE and knocked out one 75mm Anti-Tank gun. At 1600 RHQ, 'B' and 'C' Squadrons moved to the centre of Lentini as five German Mark III's were reported to be in the area. 'C' Squadron was sent out to 'stalk' the 5 tanks which were clearly seen on top of a hill overlooking the plain of Catania. After a long detour with careful use of ground as cover the Squadron got into a position to observe the tanks more closely and discovered that they were friendly and actually a patrol of the 44th RTR .B Squadron remained in the area of Lentini to deal with an SP gun and some infantry who were reported trapped and roaming about in the Lentini area. At 20:00 enemy parachutists were reported in the area of Lentini and six tanks of 'C' Squadron were ordered to the crossroads Southeast of Carlentini, where they remained in support on the infantry until next day. At 19:30 the Regiment consisting of 14 tanks (less 'A' Squadron, plus 6 tanks of 'C' Squadron) leaguered in support of 6th Infantry Brigade who had reported that the immediate area contained about 400 German parachutists who were trapped in the wood. From this position the Germans were snipping and machine gunning traffic on the road. The tanks leaguered in a close packed formation and mounted a very strong guard. Here replenishment was carried out by A1 Echelon just before the tanks moved into leaguer.
At 01:00 on 16th July the alarm was raised by the guard as the infantry had reported that the parachutists had broken out across the road going straight through the infantry lines. One sub-unit of 'B' Squadron was sent out in support of the infantry. The parachutists, however, had disappeared in the countryside. Tank crews stood-to for approx 3 to 4 hours and then bedded down an hour before daylight. A plan was made with the 6th Infantry Brigade to rout out any remaining Germans in the area by a co-ordinated barrage of mortar and Sherman HE fire on the wood. However, this was not carried out owing to the fact that the few remaining enemy were taken prisoner. The Regiment less 'A' Squadron and 6 tanks 'C' Squadron remained in Lentini area until 12:00 when it moved on orders from 4th Armoured Brigade. Earlier, at first light, the six tanks of 'C' Squadron patrolled a wide area from Lentini to the sea and captured 5 Italian paratroopers and 3 Italian naval personnel from coastal batteries, before its then rejoined the rest of the regiment at 18:00 that day. By now 'A' and 'B' Squadrons only had 9 serviceable tanks each, while 'C' Squadron had 6 and RHQ 4 tanks respectively.
'A' Squadron was ordered rest and maintenance throughout the day at 15 minutes notice. One troop was sent to support Durham Light Infantry, but the infantry failed to arrive, and although one objective was occupied by a troop of tanks but they withdrew at last light. The Regiment less 'B' Squadron then leaguered for the night, with RHQ one mile South at 4th Armoured Brigade HQ. A plan was formed to force a bridgehead across the Primosole Bridge for the following morning. 3rd CLY under command of 4th Armoured Brigade were placed in support of 168th Infantry Brigade. The intention was that 2 Battalions of infantry of 168th Infantry Brigade would attack at 02:45, on 17th July across the bridge. They were to be preceded by a barrage for 61 minutes.
On 17th July 1943, 'B' Squadron took up a position short of the South bank of the river and fired small arms from Brownings continuously for 1 hour in preparation for the attack by the infantry. 'B' Squadron reported that the barrage was falling short of the targets at 01:00 hours. One tank of 'B' Squadron was hit by an HE shell and brewed up at 01:30 but the crew escaped without injury. At 02:00 the attack went in by the infantry and it was reported that they had secured a bridgehead of 500 yards. At 05:00 'A' and 'C' Squadrons crossed the bridge and deployed right and left of the road immediately on the other side, 'C' Squadron on the right with 'A' Squadron on the left, with 'B' Squadron held in reserve with RHQ. It was now that Lt-Col Willis DSO, went forward in his tank to the demolished house to contact the Infantry Brigadier. He received orders to get 'A' and 'C' Squadrons to deal with enemy on the left of the road who were in considerable force and were continuously machine gunning, snipping and mortaring the forward infantry positions. The Lt-Col Willis then went forward 200 yards in his tank and came under heavy machine gun and small arms fire and was hit in the forehead by a small arms bullet and died of the wound about an hour later. Major A. W. Grant MC then took over command of the regiment.
From 06:00 to 11:00 'A' and 'C' Squadrons attempted, unsuccessfully, to destroy the German pocket of resistance, but Lt. J. Grimwade of 'B' Squadron supported by Major A. W. Grant MC, managed to get their two tanks into a favourable position and then, by the throwing of hand grenades by Lt. Grimwade and determined small arms fire, the Germans were forced to surrender. Very heavy casualties in killed and wounded were inflicted on the enemy and prisoners taken amounted to approx 150 Germans. At 11:20, 'A' Squadron carried out a sweep of the area left of the road to clear up any remaining enemy and the rest of the afternoon was spent in support on the infantry, who had advanced the bridgehead to about 300 - 400 yards, against possible counter-attack by tanks. At 19:15 RHQ, 'A' and 'C' Squadrons plus a Company of Carriers of 156th Infantry Brigade advanced across the plain to the left of the Reitano - Catania road to test the enemy defences. The advance was carried out under a smoke screen laid by gunners which proved very effective., but the enemy did not reveal their positions. At 20:30 the Regiment leaguered after being heavily shelled and mortared in their first area just East of Primosole bridge.
On 18th July 1943, the regiment withdrew to rest and refit and by the 19th the Tank state, was 'A' Squadron 7 (including 2 detached from RHQ), 'B' Squadron 9, 'C' Squadron 8 and RHQ 2, giving a total strength of 26 tanks. 'C' Squadron and RHQ carried out a comprehensive programme of maintenance, while 'B' Squadron was sent out to recce a possible river crossing and to support, if necessary, 44th RTR and Infantry of 15th and 17th Brigades. During this reconnaissance operation Two 88mm and 2 Mark III's were spotted along with a machine gun post and Anti-Tank gun position.
At 02:15, on 19th July, 'B' Squadron advanced up the line of the
railway and crossed followed, at 03:00 by 'A' Squadron, 'C' Squadron and RHQ .
The plan of attack was that 15th Brigade followed by 17th Brigade were to attack
towards Mistabianco to Pulmrenti and then Northward. 3rd CLY were to follow up
in support and exploit if the attack was successful. Just before first light the
Regiment deployed off the road and hid behind haystacks. The Infantry forward
defence lines were being held up by heavy mortar fire and the main attack was
brought to a standstill. The Regiment remained in the area throughout the day
and were subjected to sporadic shell and mortar fire all the time, which
continued the following day.
On 22nd July, the Regiment less 'C' Squadron (which was supporting 15th and 17th
Brigades), consisting by now of 2 tanks in RHQ, 9 in 'A' Squadron and 8 in
'B' Squadron moved and took up concealed hull down positions in the bed of the
river facing North. They were told that 3rd CLY would possibly be there for 10
days and that during that time efforts were to be made to further better
co-operation of Infantry. Each evening parties of Infantry were to visit the
Regiment and be shown over the tanks and discuss tank and Infantry difficulties.
The Regiment remained in this area until 4th August and time was spent on re-organising,
resting and on maintenance with various discussions on the best way of using an
Armoured Regiment with Infantry in close country. The Commander of 4th Armoured
Brigade attended three of these discussions between tank commanders and various
situations were raised and thrashed out. On 28th July Lt Col A. A. Cameron DSO
MC, arrived from 4th CLY, and took over command of the Regiment.
On 4th August 1943, 3rd CLY was ordered to place 'B' Squadron under command of 17th Brigade and 'C' Squadron under command of 15th Brigade, with the object of pushing forward to the foothills South of Mistabianco as patrols had reported that the enemy had withdrawn. While 'A' Squadron remained in area as a general reserve, the remainder of RHQ moved to 5th Division area at Carmito. During this time 'B' & 'C' Squadrons were under complete command of their respective brigades and for accounts see stories to follow
While 'A', 'B' & 'C' Squadrons were supporting the infantry
RHQ remained with 5th Division HQ during 5th and 6th August during which time a
plan was made for the 7th August, which entailed, Lt-Col A. A. Cameron
commanding of a column consisting of 1 Troop, 5th Recce Regiment, 1 section
245th Field Company, Royal Engineers and 'B' Squadron 3rd CLY.
The column was to be known as CAMCOL. 'A' Squadron was to go to
a similar column known as BLOCKCOL (Lt-Col Blockley). The plan was that CAMCOL
should advance along Nicolosi - Pedara - Trecastagne - Viagrandre road and bring
pressure to bear on the enemy's right flank. BLOCKCOL was to make a similar
advance along Camporotondo - Vascalucia - Tremestieri - S.Giovanni road towards
La Punta. The object was to force the enemy to withdraw in order to assist 50th
Division in their advance along the coast towards Acreale. At 17:30 RHQ moved to
Nicolosi and 'B' and 'C' Squadrons rejoined the Regiment. Lt-Col Cameron held a
conference of all commanders in the column just before last light. The bands of
advance were to be Camporotondo - Nicolosi (Grouse), Tremestieri - Pedara
(Partridge), S.Giovanni - (Woodcock). Start point was to be crossed
by the leading element at 0:600 7th August 1943.
Reveille was at 05:00 hours and the various units 'Netted' on the radio at 05:15, with 56th Bty, 24th Field Regt RA, 92nd Field Regt RA, the Commander of the Green Howards, and the Troop, from 208th Anti-Tank Battery all netted on the Regimental frequency. 'B' Squadron flicked to own frequency. 'B' Squadron reported they were just behind the Start Point at 06:00. As it advanced the column held up by Anti-Tank mines and mortaring. 56th Battery engaged the mortars and the gunners also dealt with Anti-Tank gun soon afterwards. Report received from BLOCKCOL that they had reached Grouse. By 06:40, Monti Rossi and high ground reported clear of enemy and advance resumed in face of opposition and at 07:45 the lead Armoured Car from the 5th Recce Regiment, Troops was reported destroyed by fire from a suspected Tiger tank. A plan put into operation to get observed fire on Tiger and to knock it out with leading tank troop of 'B' Squadron, but the Tiger had by then moved on. At 11:00 the forward elements of the Green Howards were entering Nicolosi having encountered continuous delaying action en route and by 13:00 the town was reported clear. Having put into place flank protection to the North and South of town, the forward elements pushed on to Pendara, however the road was mined and badly cratered, so after the Royal Engineers completed repair of road for light traffic and advance continued at about 14:00. Soon after 'B' Squadron reported mortar fire and an 88mm firing from outskirts of Pendara following by a suspected Tiger on road ½ mile in front of them and arrangements made to put forward Green Howards into the town, while artillery engages the Tiger and 88mm gun. By 16:40 the road ready for tanks and heavy traffic and 'B' Squadron Squadron advanced to support the infantry and by 18:30 the leading infantry in were in Pendara supported by tanks, although the enemy was still putting up light opposition. Once the town was cleared and with flank protection arranged and advance Eastwards continued, but by 19:05 a Tiger tank was reported on road and so were plans made to destroy it by using a Pheasant 17-pdr Anti-tank gun. By 20:00 13th Infantry Brigade started to arrive a Pendara to take over the town from CAMCOL, with the town being handed over by 21:30.
By 8th August, 3rd CLY was again under command of 5th Division and in reserve and served with it until the fall of Sicily, on 17th August 1943. Then the 18th the Regiment moved to area one and a half miles West of Mistabianco, and 'C' Squadron returned to the Regiment from the Messina as part of Operation Blackcock. (See below for details)
The Regiment once more came under command of 4th Armoured Brigade whose HQ was at Aci Costello. Here until 26th August, the regiment spent the time preparing its camp site and general maintenance was begun extensively on all tanks. The regiment spent the remainder of August undertaking various training exercises for target practice, before being inspected by the Brigade Commander, on 30th August.
44th RTR in Sicily: The regiment under Lieutenant-Colonel E. D. Rash arrived in the Orontes to no apparent opposition, but the TULO (tank unloading liaison officer) party, who had landed at 02:30 hrs on 10th July at Avolo, were destroyed by shellfire. The main body moved ashore on foot and 'married up' with their tanks and vehicles inland, which took thirty-six hours. During the afternoon of 12th July, one troop, supporting 60th Brigade of 50th Northumbrian Division, destroyed four guns and captured sixty rather timid prisoners beyond Palazzolo. However, the Luftwaffe was active and two ships were hit and nine Shermans of 'C' Squadron were lost on board ship. To compensate for this, on the morning of the 13th, beyond Palazzalo Acreide, No. 5 Troop, supporting 6th Bn. Durham Light Infantry, knocked out an astonishing eight Italian R-35 tanks, six 105mm guns, twenty-nine trucks and much else, and put in the bag a divisional general, three brigadiers, four staff officers and fifty other ranks. Late that night 44 RTR halted just beyond Syracuse and came under brigade command for a lightning thrust' on Catania.
TAC Brigade now coordinated the advance from the 21st July 1943. The corps commander decided to concentrate the brigade on continuing the advance through Lentini towards Catania, led alternatively by 3rd CLY or 44 RTR and 'A' Squadron of the Royals Dragoon. A brigade of 1st Airborne Division were supposed to be dropped during the night to capture the Primosole Bridge, but they were not. In fact it was the Brigade HQ and a handful of men that held the bridge, removed the detonating fuses of the explosive charges, and that were eventually driven off by violent counter-attacks and forced them to leave the bridge.
A bridge destroyed to the south-east of Carlentini meant a detour and the going was slow and a force of Four hundred German paratroops in a wood near Carlentini delayed 3rd CLY, 'A' Squadron, so it was not until the afternoon that the force passed through the towns of Carlentini and Lentini, which were lined with cheering crowds. Two miles north of Lentini the leading troop of 'B' Squadron met resistance from a force of machine guns and mortars. However, with the assistance of the carriers from 69th Brigade and another troop the resistance was cleared out of the way and the advance continued. A contingent of British Paratroopers were found holding the high ground to the right of the road and 44th RTR stayed with then until they were relieved by 151st Brigade and just south of the Primosole Bridge, 44th RTR found many targets. 44th RTR leaguered for the night on the heights overlooking the plain of Catania below. As some of 'A' Squadron were admiring the scene a number of shells from a German tank below ruined the tranquility. The Germans had considered the silhouettes of their tanks too good a target to miss and so hull down positions were quickly taken up.
At first light on 15th July 44th RTR advanced towards Primosole Bridge, which carried the main road to Catania over the Simeto River. Ground around the bridge was not good tank country as it was open grassland with little cover and drainage ditches that were considered impassable to tanks. To the north of the Bridge was Mount Etna from which observation of any movement was very clear. The area around the bridge and to the north of it was held by German Paratroops of the Hermann Goering Parachute Division. When 44th RTR arrived it found the Germans well entrenched and in a sunken road among the vineyards near the bridge. The previous night the Durham Light Infantry (DLI) had linked up with the British Paratroops who had just been driven from the bridge, but with no previous reconnaissance the were unable to attack until the morning.
Initially, 44th RTR stayed on the high ground south of the bridge and shelled the area surrounding it. Then at about 0730 'A' Squadron (on the right) and 'B' Squadron (on the left) advanced to support the DLI. 'B' Squadron crossed the river west of the bridge and step a bridgehead, but were unable to hold on, with several tanks from both Squadrons being hit by fire from 88mm guns and one from 'A' Squadron was blown up on a minefield across its line of advance. Throughout the day the Germans maintained accurate sniping from the pillboxes and buildings at either end of the bridge and mortar bombs regularly landed amongst the tanks, which made life difficult for the crews to venture outside the tanks. During the day each Squadron took turns to line the river bank and although the attack had failed it and the subsequent harassing fire did prevent the Germans replacing the demolition charges. However, the bridge was now blocked by burnt out vehicles and general shell damage. As darkness fell the tanks withdrew and first attack to cross the bridge on the 15th July by 151st Brigade and 44th RTR had failed. 'A' Squadron lost four tanks and eighteen captured in their assault with Lieutenant-Colonel Rash and the MO, Captain Connolly, being killed on the same day.
Orders were given to support a night attack by infantry, who were to cross several hundred yards west of the bridge. This was to the 8th Bn. Durham Light Infantry, supported by 3rd CLY, under a one-hour artillery barrage. At 2000 the tanks moved forward to their allotted positions, with 'A' Squadron on the right, 'B' Squadron in the centre and 'C' Squadron on the left. At 0100 the tanks opened fire as ordered, firing in short bursts for fifty minutes then continuously. The noise was tremendous and considerable ammunition was expended, but many Germans had survived the barrage. The infantry attack was only partially successful as only two Companies managed to get across at night, but 3rd CLY and the Durham Light Infantry captured Primosole Bridge, an action which resulted in the death of their CO, Lt-Col Willis. At 0400 'A' Squadron supported a party of Royal Engineers who cleared the bridge of obstacles and at 0500 hrs it sent a troop over it to push up the road. However, having successfully cross the bridge each of the three tanks was picked off by an 88mm site a few hundred yards up the road. All the crews baled out except the driver of one tank who drove it back over the bridge on fire, where the flames were extinguished. Later another troop from 'A' Squadron went forward, on the orders of the Brigadier commanding 151st Brigade, only for the lead tank to suffer the same fate as the previous troop. After this 'A' Squadron was withdrawn to an area south of the bridge and by this time the tank crews were extremely exhausted having had very little sleep for the past three nights. Many were so 'drunk' with weariness, that they fell asleep immediately wherever they hit the ground and one man was found asleep over a small bush.
For the rest of 16th July 44 RTR sent 'B' and 'C' Squadrons in turn sent a Troop across the bridge to support the infantry and the tanks were subjected to heavy small arms fire each time. The infantry had secured a bridgehead over the river and were only just holding on to it. At 1030 it was reported that it was impossible to deploy across the bridge to help clear the enemy to the east of the road, as no one knew who held what ground in the thick vineyards. So it was decided to only deploy a troop at a time to dealt with specific targets identified by the infantry. At nightfall the whole of 44th RTR withdrew to leaguer several miles back from the bridge and many of its men enjoyed the first proper nights sleep for several days. During the night the rest of the 151st Durham Brigade crossed the river and despite heavy opposition by the Germans, by mid-morning on the 17th the bridgehead was secure. However, between it and Catania most of the Hermann Goering Division was now dug in, blocking the way to the town. The contrast was clear to all now between the relatively easy-going Italian defences and the brave skilful German parachute troops. One witness wrote after the battle for the bridge, that they had never seen such carnage. The brigade had done well but with severe losses to officers and men and tanks.
The whole of 44th RTR rested for most of the day on 17th July, enjoying a wash, a shave and eating. A new MO arrived in the form of Capt. C. M. Rowland R.A.M.C. During the evening the squadrons were deployed to support 69th and 168th Infantry Brigades, who were moving forward during the night to enlarge the Bridgehead. As dawn broke on the 18th 'A' Squadron, formed up in two half squadrons was in place to support the London Scottish and London Irish to the east of the road, while 'B' Squadron, again formed up in two half squadrons was in place to support 6th and 7th Bn Green Howards on the west side of the road. 'C' Squadron was in reserve. Although 'A' Squadron lost one tank on a mine supporting the London Scottish the main action was with 'B' and 'C' Squadrons. After being fired at by an 88mm 'C' Squadron moved to the right of the road, to the read of 'A' Squadron, and then at about 1630 the moved to support the Royal Berkshire Regiment, in their attack on a wood. The advance proceeded alright until hidden machine guns opened fire on the infantry from their rear and the tanks moved to cover the withdrawal of the infantry and to silence the machine gun posts. One tank was knocked out by a mortar bomb and 88mm fire was seen coming from the area of a pillbox on the edge of the wood. After initially pulling back and plastering the area of the pillbox with HE and AP fire the Squadron advanced again over open ground at about 1830 hrs. Heavy 88mm fire again hit the Squadron and one tank was knocked out so they were ordered to return to leaguer, which they did about dusk carrying the wounded on the backs of the tanks. Elsewhere 'B' Squadron was also heavily engaged and at 1615 they moved westwards to assist the Wiltshire Regiment from 5th Infantry Division, which had crossed the Simeto two miles west of Primosole bridge. After laying smoke to cover the advance of the infantry across a railway line, the whole of 'B' Squadron leaguered with the forward infantry company for the night.
At first light on 19th July at troop from 'B' Squadron moved to support the Inniskilling Fusiliers who had reported being attacked by enemy tanks, near one of the other bridges across the Simeto. The troop engaged four German MK III Specials, knocking out one of them before the others retired, but suffered the Troop Commanders tank being knocked out, but he transferred to another and continued the advance. The whole of 'B' Squadron now joined up with 'C' Company of the Cameronians and advanced northwards. Here they came up against ant-tank fire, but managed to destroy one 50mm gun before the same Troop Commander lost his second tank and moved to a fresh one. Its was mainly due to this Troop Commander (Lt. Hale) that the Squadron helped get the infantry into positions across a road running northwestwards from Primosole Bridge. While the rest of the Squadron withdrew to replenish one Troop was left with the infantry, but in the afternoon the infantry moved back from their most northerly positions without informing the tanks. The Germans took advantage of this withdrawal to move up two anti-tank guns and opened fire on the 'B' Squadron's Troop. Two of the tanks were quickly knocked out including one which wad carrying an artillery Forward Observation Officer and the third one returned fire , but the commander was killed by a shell which passed over the too of the turret, while was directing the fire with his head above the cupola. Later a fresh troop came up to re-establish contact with the infantry, but at dusk the whole squadron withdrew to positions just south of the bridge they had started from that morning.
This was the last of the serious fighting 44th undertook in the area of Primosole Bridge and with the rest of 4th Armoured Brigade, 44th RTR was in reserve in the estuary valley of the River Gorna Lunga, for the rest of the month. The enemy held the same line south of Catania, the infantry and armour on both sides sitting facing each other. A huge German naval gun on the slopes of Mount Etna shelled the Primosole bridge from time to time. The 44th RTR encountered the new, noisy multi-barrelled Nebelwerfer, and everybody suffered from mosquitoes which gave malaria to quite a few. Each day one Squadron stationed itself north of the bridge and spent the day watching enemy activity, burying the dead, swatting the flies and eating grapes. This area north of the river was extremely smelly and flea ridden, so they were always very pleased to move back to the leaguer positions south of the river each night. One benefit was the arrival of 'Compo' rations. A tank crew now had a box full of goodies sufficient for three or four days - tins of stew, steak puddings, suet puddings, tinned fruit, sweets, cigarettes and ready-mixed tea, sugar and milk powder. The lava outcrop of Mount Etna played havoc with the rubber bogie wheels, so many tanks were repaired by the fitters. The brigade strength on landing was ninety-five, but no fewer than twenty-five had been knocked out. At one stage there were only fifty-five 'runners'.
The advance resumed on 1st August 1943, with Lt-Col F. R. Lindsay taking over as the CO of 44th RTR. On 4th August 'A' Squadron moved forward at first light and its No. 4 Troop did good work supporting 6th Bn Durham Light Infantry (DLI), when they became held up by pillboxes and machine gun posts. During this action RHQ, 'B' and 'C' Squadrons remained in the leaguer position south of Primosole Bridge. On the 5th the infantry moved into Catania which had been evacuated by the enemy in the afternoon 'A' Squadron moved into the town which seemed completely empty, but that evening while they cooked their evening meal in one of the main squares on the north side of the town, townsfolk of all ages started to emerge from their hiding places. They had had little or nothing to eat for many days and watched longingly as the troopers ate. However, soon much of the squadron's meal found its way into 'enemy' stomachs. During the morning of 6th August 'B' Squadron relieved 'A' Squadron, followed soon afterwards by RHQ and 'C' Squadron, less one troop which was supporting a battery of Priests Self-propelled guns. The reason for the withdrawal from Catania was that XXX Corps had made a left hook round the west side of Mount Etna, forcing the Germans to withdraw from the region or risk being cut off.
Catania was occupied on the 5th and the brigade harboured in Aci Castello, a pretty little seaside town 8 miles to the north.
The 8th Army was putting on strong pressure from the south and the US 7th Army from the west. For a week XIII Corps followed the retreating enemy slowly and painfully northwards up the narrow strip between the mountains and the sea, constantly held up by skilful defensive rearguard actions, including the clever use of mines, road blocks, blown bridges, booby traps and the occasional single Tiger tanks taking out the lead Shermans.
On 7th August 'B' Squadron moved forward to support the infantry in case of an enemy counter attack from Aci Reale, with the rest of the Regiment remaining in leaguer to the west of Catania. The following day, the 8th, one troop from 'B' Squadron supported the DLI who were being held up an the German rearguard, by pulverising a pillbox and knocking out machine gun posts in the rubble of buildings on the road to Aci Reale. Meanwhile the rest of the squadron advance to within about three miles of Aci Reale and 'C' Squadron reached Morgioni. Movement was extremely difficult as the roads were narrow and twisting with banks of either side, which mean the tanks had little or no room to manoeuvre. This limited the role of the tank for the remainder of the Sicilian campaign
On 11th August 'A' Squadron received orders to send seven tanks to take part in a landing in the rear of the enemy on the east coast and moved down to the docks in Catania, but at the last minute the operation was cancelled. The next day, 12th August, No.2 Troop of 'B' Squadron supported the infantry in taking the town of Giarre. The squadron tried to form a mobile column, along with some infantry and Royal Engineers in an attempt to prevent the enemy from blowing bridges and roads at they withdrew, but this failed do to the large number of demolitions on the road. Later in the day the squadron reached Taormina, and acted as the forward link between the lead battalion of the Green Howards and the HQ of 69th Brigade. Elsewhere 3rd CLY had started from west of Nicolosi then Pedara, losing men and tanks each day. They too found movement was difficult along narrow roads, twisting and turning and dangerous at each bend.
Operation Blackcock: was a seaborne operation to land No. 2 Commando 'C' Squadron, 3rd CLY, a troop of SP guns from 56th Field Battery RA and jeep-drawn 3.7" howitzers, a troop of anti-tank guns plus 295th Field Company RE less a platoon near Cap d'Ali, to the south of Ali Marina, and bypass the German defences. when things had become organised, to exploit South to contact 50th Divison and North to capture Messina) the same day. On 14th August the Shermans were waterproofed and Brigadier Currie and TAC Brigade HQ set off in LSIs and LCTs from Catania, and the force sailed on the evening of the 15th.
The early hours of 16th August, were a very moonlit night and the coast was plainly visible at 02:30. Unfortunately the Commando landing at 03:00 had taken place 5 miles north at Scaletta, but the landing was unopposed and apart from a little street fighting there was little firing. There now ensued a delay of several hours while a suitable place for the LCTs was found. During this time demolitions were continually taking place in the area. Eventually 'C' Squadron landed at Scaletta at 08:00 and by 10:00 the Royal Engineers made an exit and the force was ashore. During the landing there was shelling from Italy, itself, and 88mm airbursts from the North. On landing No. 1 Troop went to a main one roadblock while No. 3 Troop manned another, but were shelled and mortared for the rest of the day, while firing 30 rounds of HE at enemy Observation Posts. The remainder of the Squadron assembled in the village preparatory to moving North. During the day several batches of prisoners were captured and at 17:00 the Squadron leader was called to a conference to receive orders about the march to Messina. The intention was to move by night to capture Messina and prevent any further demolitions. The method was to organise a column, commanded by Lt-Col Churchill, CO 2 Commando and consisted of the whole force less two section of Commandos, one section of Royal Engineers, Forward Observation Officer RN, one troop 3.7" Howitzers and one section of 6pdrs, plus, No. 1 Troop 'C' Squadron, and No .4 Troop consisting of 2 tanks. This force remained behind in Scaletta.
When then column advanced, the first halt was due to a demolition of the road and railway bridge at 297413. This was a big demolition and was impassable to all vehicles so a detour was eventually found and the Royal Engineers blew up several walls and bulldozed a detour round the beach, but it was necessary to tow all wheels round this place. The force eventually moved off again at 02:00. During the early part of the work on the detour, mortaring was encountered, followed by mines at the bridges at, S.Paolo, Aponti, Stefano, Calati and Moleti.
At Mili Marina the road and railway bridge were blown, this point was passed by 07:00, after Royal Engineers again made a detour. By now it was decided that the advance was too slow and the Commandos mounted the tanks. More mines were lifted at Tremestieri, Pitunina and Contesse, while at Gazzi the road and rail bridges were again blown and a further delay took place. However, by 09:30 the force was on the road was clear to Messina and in the outskirts of the town it encountered terrific reception, with flowers, fruit and wine being piled on the tanks and several tanks had 'V' signs made of blue flowers on them. At 09:45 the Brigade encountered American troops in the outskirts and at 10:00 the Squadron arrived on the front and were shelled by guns on the mainland. They found Messina to be empty of the enemy (except for much equipment) who had escaped to the mainland by ferry. The remainder of the Squadron, having assisted a further landing of reinforcements and stores at Scaletta arrived at 10:30 in Messina. The Squadron had breakfast at this point and remained here until 18:00 when the town was handed to the Americans and the Squadron pulled out to an area South of Gazzi, where they were told to return to Scaletta beach by 19:00 and the tanks were lined up for embarking and return to the rest regiment.
Later on 17th August, General Patton was received in front of the town hall. He was predictably unimpressed by 8th Army's speed of advance! However, after the Operation was completed the GOC XXX Corps, Sir Oliver Leese, wrote, "I realise you were landed on the wrong beach. I knew how difficult your task was made by constant enemy demolitions and the shelling from the mainland. I congratulate you on forcing your way into Messina so quickly."
Following the fall of Sicily t
he brigade settled down for reorganisation and training near Fiumefreddo, with orchards, vineyards, sea bathing, ENSA concerts, including George Formby with his ukulele, and an RTR band. On 29th and 30th August 1943 Brigadier John Currie inspected his brigade in great detail. At the end of August 'C' Squadron were told they were to embark for a proposed landing in Italy, but this was cancelled at the last moment just as they had assembled at Aci Castello for embarkation. During the month reinforcements from other regiments arrived and these were much needed as in addition to battle casualties the Brigade had suffered badly from malaria, too.On 7th September the Brigade moved to Paterno, 15 miles west of Catania. Brigade HQ stayed near the docks for another twelve days and enjoyed what was described as a month of recuperation and rest in 'the shady groves of Mistabianco'. Films were shown, there were ENSA shows, band concerts were held among the olive groves and an officers' club was opened at Aci Reale. There was no shortage of Marsala and light local wines. The natives were now friendly, and when members of the brigade climbed and explored Mount Etna (all of 10,869 ft high) they found a notice posted, 'This volcano was captured by 13 Corps, 7th August 1943'.
At the end of the Sicilian campaign Brigadier Currie sent a message to his brigade. 'We were a scratch force drawn from all quarters of the army, yet everyone worked together. The dash and determination shown by all ranks was beyond praise.'
The total Allied casualties were 22,800. About 15,000 Axis troops were captured and another 5,000 killed or wounded, but Kesselring had fought brilliantly. No fewer than 40,000 Germans and 60,000 Italians crossed the Straits of Messina to fight another day. Operation Husky was over - now for mainland Italy.
On 3rd September 1943, the 8th Army assaulted the toe of Italy, and in the thirteen days that follow, it had advanced 200 miles north to link up with the Anglo- American force breaking out of the Salerno bridgehead. The Italians surrendered on 8th September 1943, and the following day 1st Airborne Division landed unopposed to capture the airfields around Taranto and its port.
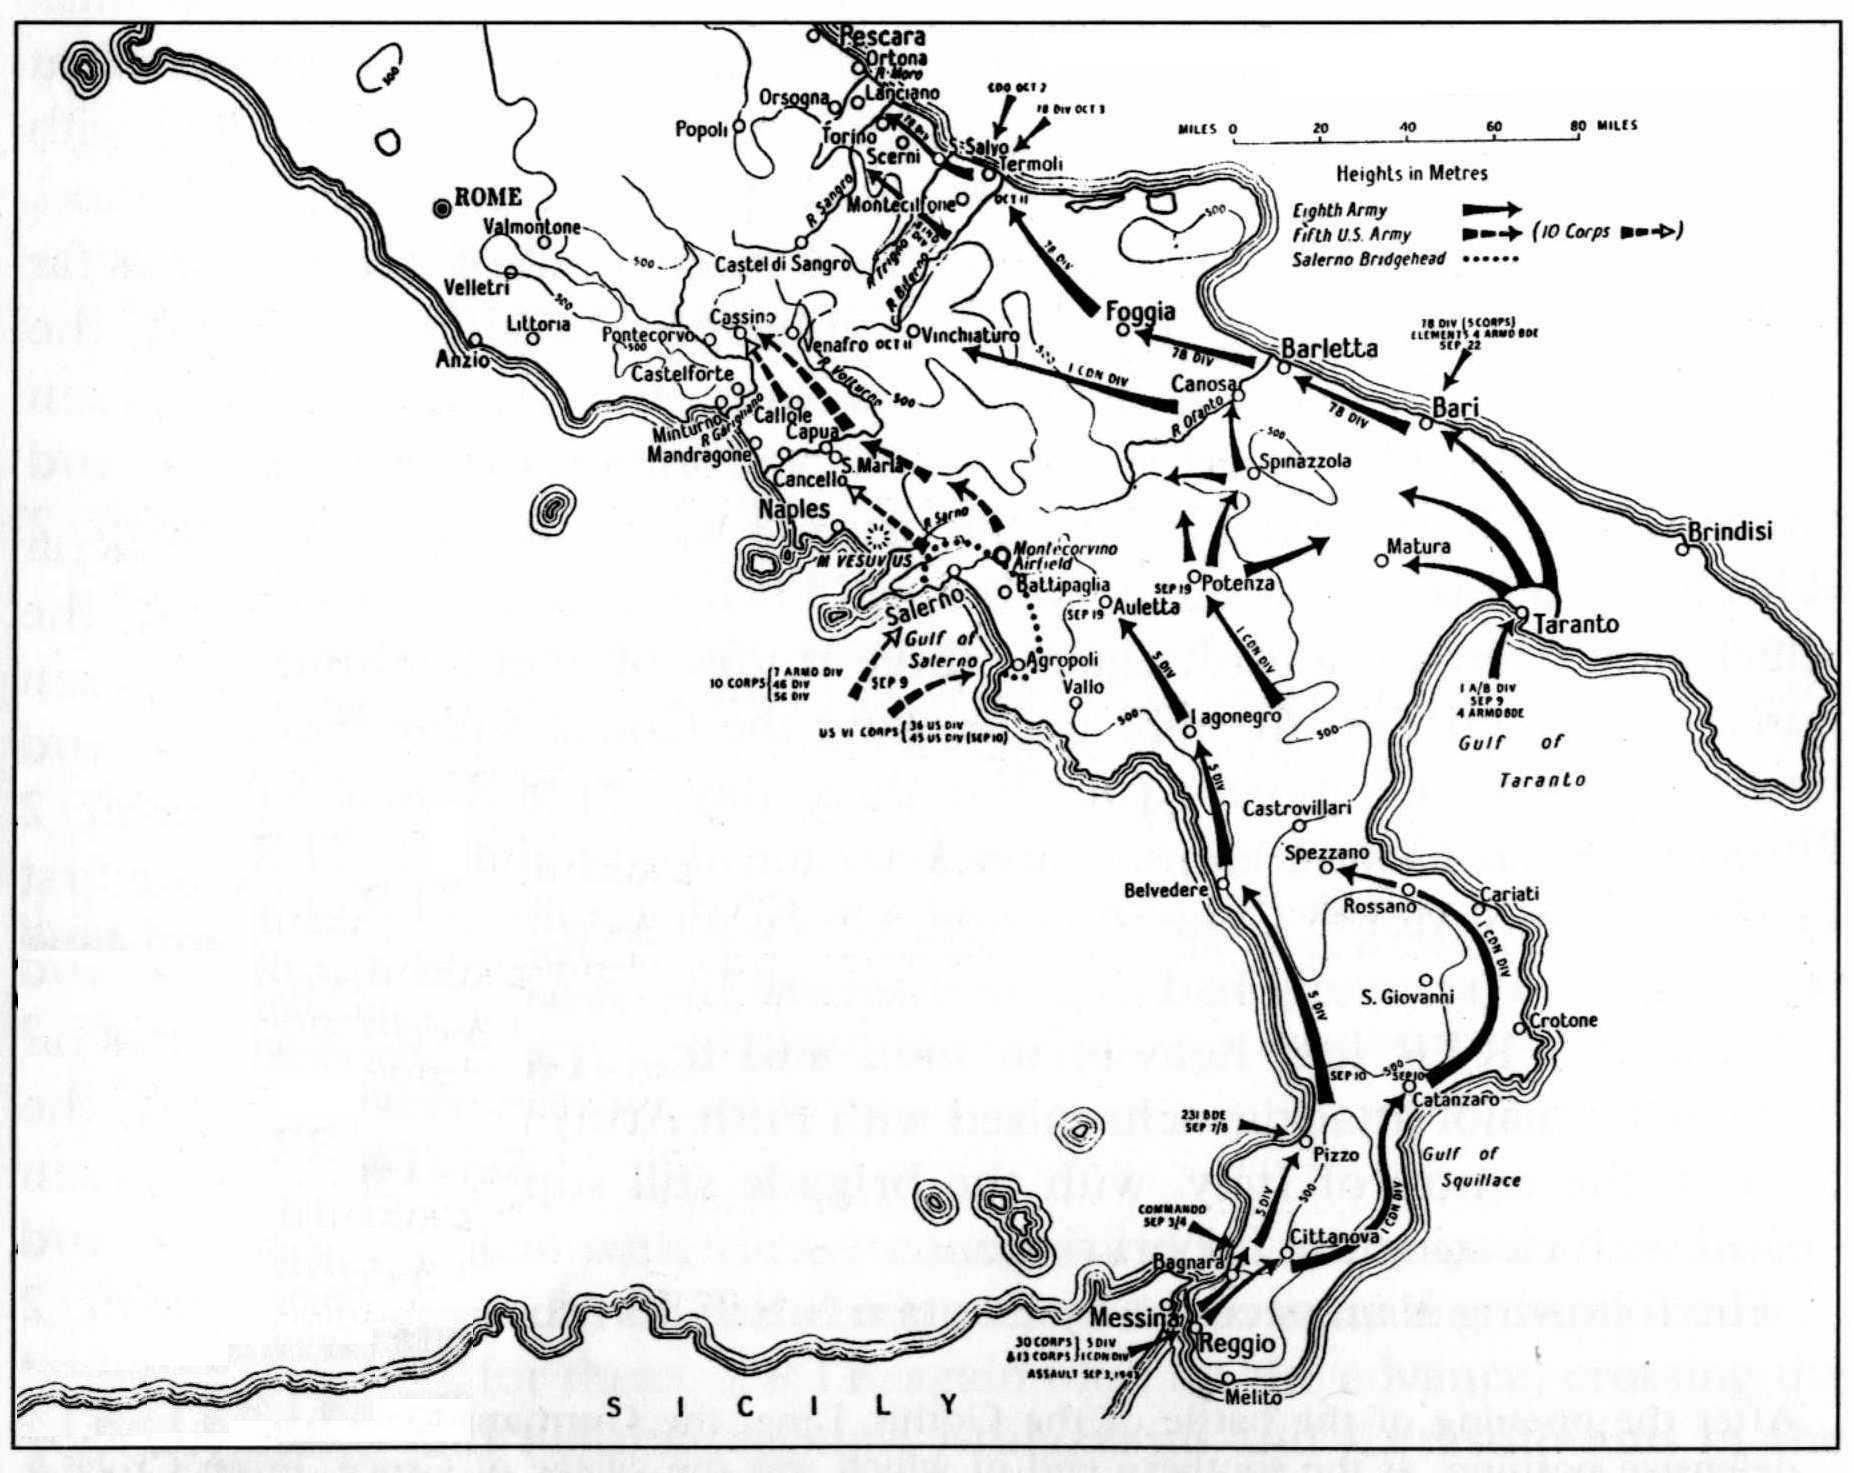
The 4th Armoured Brigade now had more units under command, 46th and 50th RTR, 111th Field Regiment RA. Orders were received on 16th September for a move by sea (tracked vehicles) and ferry (wheeled vehicles) from Messina to Taranto. Click here to see the Brigade Order Of Battle at this time. 44th RTR received their orders to move on 21st September and their tanks were loaded onto two LSTs at Catania docks between then and the 24th. The first move would be 30 miles north-east to Bari to come under command of 78th Division. On the 20th Lieutenant - General Sir Oliver Leese, XXX Corps Commander, addressed the brigade on the quayside and bade them farewell to Sicily. The convoys escorted by destroyers took thirty-six hours in fine weather, despite the threat of magnetic mines. In Taranto, the docks were filled with the surrendered Italian fleet, which was an impressive sight. The wheeled vehicles which had crossed from Messina to Reggio de Calabria, had problems with bomb debris in both towns, but after arriving in the 'toe' of Italy they drove along spectacular mountain roads to Catanzaro and there along the 'instep' of Italy to Taranto arriving there three and a half days later, with 44th RTR's 'wheels' completing the journey by 29th September, 1943. On the 24th a very mixed composite force of Royal Dragoons, Sharpshooters, two Squadrons from 56th Recce Regiment, one machine gun company of 1st Bn. Kensington Regiment (Princess Louise's), 17th Field Regiment RA (less one battery), 626th Field Squadron RE and the more exotic SAS and 'Popski's Private Army' set off. On 25th September, 2nd KRRC disembarked at Taranto on to rejoin the Brigade after refitting in North Africa and with its forces complete the 4th Armoured Brigade had become the spearhead of the 8th Army, advancing up the east coast of Italy.
Despite blown bridges and well placed rearguards armed with anti-tank guns, the brigade crossed the River Ofanto, but the Sharpshooters (3rd CLY) soon had problems with their Shermans. Under a blazing sun and over melting tarmac roads the rubber bogie wheels soon deteriorated. 'B' Squadron, 3rd CLY, limped into Bari with only 30 per cent effective runners. Inland the rest of the Sharpshooters moved north to Canosa ready to launch a serious attack against Foggia and now that their war was over the Italians cheered on their liberators. The Royal Dragoons occupied Canosa, and soon the SAS reported Cerignola clear of the enemy. Brigadier John Currie's plan to attack Foggia and secure its airfields was based on two mixed columns, 'Bakerforce' on the right and 'Cameronforce" on the left. The River Cervaro, 6 miles south of Foggia, was defended by the Germans in strength, but despite four bridges being blown, Cameronforce entered Foggia, which had been heavily bombed by the RAF, at 08:00 hrs on 27th September. The Royal Dragoons pressed on to Manfredonia and San Severe, and in Lucera, 56th Recce Regiment freed scores of Allied POWs. Patrol bases were established at San Severe, Lucera, Troia Satriano and San Paulo.
The Sharpshooters had been in the fray non-stop, having destroyed an enemy armoured car, and losing a Sherman to an 88mm, but then stalking and knocking out another 88mm Anti-Tank gun. The regiment had a troop of scout cars ambushed and destroyed outside San Severe, where the town gave a splendid funeral to the fallen Sharpshooters with crowds of thousands lining the route from church to cemetery.
The brigade was ahead of its echelons, so it halted and only resumed its advance again on 1st October when the Sharpshooters, with 5th Bn. Northamptonshire Regiment of 11th Infantry Brigade under its command, moved in column to San Paolo and forded the River Fortore, 7 miles south of Termoli, which was the brigade's next objective. All the bridges south of Serracapriola had been destroyed and there appeared to be only two possible crossings, with one near the sea at Ripalto and the other about two miles upstream from the main road bridge. The plan was for the Sharpshooters, less a squadron, to cross by the latter bridge and take the ridge south of the town and when this was done, 5th Bn. Northamptonshire Regiment was to cross nearer the main road and attack Serracapriola through the thick olive groves round the town. Meanwhile the Royal Dragoons, with one squadron of Sharpshooters and part of 56th Recce Regiment, were to cross to Ripalto and take Chienti, the whole operation being supported by 17th Field Regiment RA. All went well, Serracapriola and Chieuti were taken, and 5th Bn. Northamptonshire Regiment, took over the defence of the town. Despite heavy rainstorms, that turned the country into a sea of mud and made movement off road impossible, the country beyond Serracapriola appeared to be fairly good going for tanks and the brigade was ordered to continue the pursuit and seize the high ground overlooking the River Biferno. No opposition was met but progress was made very difficult by extensive demolitions and mines, with the brigade reaching the line between San Martino and Ortocannone by 2nd October.
The Sharpshooters' tanks had difficulties in the unaccustomed thick mud. Vehicles of the Recce Troop were temporarily abandoned and the 'A' Echelon trucks stuck in the mud of their leaguer area. After their 200-mile advance from Taranto their Shermans needed intensive maintenance. By 5th October the whole brigade (with the Sharpshooters in reserve), but now including 2nd Battalion KRRC, 98th Field Regiment RA, was concentrated near Lucera. Meanwhile, 44th RTR had started to move northwest up the coast on 1st October and their tracked vehicles were embarked at Taranto and moved by sea further the up the coast to Manfredonia on the 5th. The wheeled vehicles moved my road through Bari to a new leaguer just southwest of Foggia, arriving on 6th October. Click here to see the Brigade Order Of Battle at this time.
The German High Command ordered 16th Panzer Division to move from the Salerno Front to capture the small but useful port of Termoli 4 miles north of the River Biferno. Before they could do so Commandos and SAS had seized Termoli on the night of 2nd/3rd October, and were reinforced by infantry from 78th Division. The main bridge over the Biferno had been blown up, and on the night of 4th/5th two battalions of Panzer Grenadiers launched a ferocious attack on the Termoli garrison. Lieutenant-Colonel Cameron received urgent orders for the Sharpshooters to cross the river at dawn and come to the rescue of the beleaguered 11th and 36th Infantry Brigades of 78th Infantry Division.

After heavy casualties, the sappers completed a bridge over the River Biferno, and at 14:30 hrs 'C' Squadron, 3rd CLY, led by Major Bobby Gale, crossed to help sustain 11th Infantry Brigade's defence of the road into the port, while the rest of the Sharpshooters headed for Difesne Grande to take on the enemy tanks threatening to engulf 36th Infantry Brigade. For thirty-six hours there was fierce fighting, with Shermans fighting German MK IVs. Attack and counter-attack went on continuously and by the end of the battle 'C' Squadron had lost eight tanks, but had knocked out six MK IVs and killed scores of Panzer Grenadiers. During this fighting the Germans had got to within 400 yards of the port itself. In the follow up attack on Croce 'A' and 'B' Squadrons lost another five Shermans supporting 38th Infantry Brigade, which had just arrived to reinforce the Division and the defence of Termoli. Soon the German positions were overrun and the Battle of Termoli was over. At the end of the engagement, having been relieved by 12th Canadian Tank Regiment, the Sharpshooters had only eleven tanks in battle worthy condition and thirteen officers and men had been killed, with another fourteen were wounded.
Brigadier John Currie wrote to Lieutenant-Colonel Cameron. 'You have had a damned good gallop and are far and away the best trained regiment in the Brigade.' Eight decorations were earned in this fine action.While the CLY had been engaged at Termoli, 44th RTR moved towards Troia and then northwest to finally leaguer just northwest of Lucera on 8th October. This was a scheme to practice cross country movement and was not a great success and it was clear that the regiment needed more experience in negotiating muddy fields and Italian rivers. During the move a number of tanks had got stuck in the mud and one tank from 'C' Squadron had almost been submerged during one river crossing and had to be evacuated. The regiment history records that there was rumour that a mermaid had been found in the turret, but this was latter found to to be the case!
On the 9th October 1943, General Montgomery inspected 44th RTR and decorated five officers and men for their part in the Sicilian campaign. For the next two weeks the brigade was in reserve engaged in schemes, TEWTS (Tactical Exercise Without Troops), range firings, map reading, even convoy driving practice in the Serracapriola area. Here the solid farmhouses in the Massa Tronco area gave warmth and shelter. Quartermasters issued battledress instead of khaki drill. Canteens were opened, with one called The Contented Penguin being in an old wine press. Foraging parties went out each day and the local Italian pig meat proved popular.
The CLY armoured strength was down to twenty-nine tanks and four scout cars, but thirteen new Diesel-driven Shermans plus forty-six reinforcements arrived. RSM Holloway reminded the Sharpshooters that guard mounting, saluting and ceremonial drill were still important even in the midst of a thoroughly unpleasant campaign. Meanwhile 2nd Bn. KRRC had spent five weeks west of Tripoli training, playing games and swimming. They arrived in American LSTs at Taranto on 25th September, moved on 8th October to Foggia and on the 28th to Termoli to defend the Forward Maintenance Area. On 9th October 1943, 46th RTR were sent up to join 78th Infantry Division in their push up the coast road and on the 22nd October 50th RTR joined 8th Indian Infantry Division on the inland route through Larino. The remainder of the brigade joined the Sharpshooters south of Serracapriola on 24th October 1943. Later on the 27th, 98th Field Regiment joined 78th Infantry Division. By now 46th RTR were supporting 78th Infantry Division who were facing the River Trigno, and 50th RTR had one squadron forward with 11th Indian Infantry Brigade, where they had done magnificent work, getting their tanks to places where it was hard to believe that a tank could possibly go. They were firmly positioned on a hill overlooking the River Trigno opposite Celenza, where they could only be supplied by mule.
On 3rd November the Battle of the River Trigno began. In a hard morning's fighting 46th RTR dealt with six enemy tanks and two SPs, but lost seven of their Shermans. Some officers of 44th RTR had a grandstand view of the battle in support of 78th Division from an Artillery Observation Point on the high ground overlooking the River Trigno. There they saw twenty MK IV tanks trundling briskly into battle (in troops) down the road from Vasto towards the river. Although heavily shelled by a Medium Artillery Regiment the German tanks reached the river where they knocked out the tanks of 46th RTR in very quick time. The army commander now ordered the Brigade Commander to move 44th RTR forward, 30-odd miles from Serracapriola to take charge of the armoured battle. To get there as quickly as possible 44th RTR drove through the night, with the tank headlights switched on, following the tracks and rear lights of the tank in front, and crossed the river at dawn, before moving up towards San Salvo. The going was heavy, mines and shelling held up the advance by 44, 46 and 50 RTR. Eventually, the high ridge south of Vasto was captured by 5th Northamptons of 11th Brigade, supported by 50th RTR. The advance continued along the San Salvo - Vasto road, 44th Royal Tanks following 50th Royal Tanks to the west of the axis, covering the left flank. The intention of the brigade was that 50th Royal Tanks would support 6th Bn Royal West Kent Regiment of 36th Infantry Brigade on the coast road, while 44th Royal Tanks and 98th Field Regiment RA would support 11th Infantry Brigade on the axis from Cupello to Scerni, and Vasto was entered on 5th November 1943, by 46th RTR, who had taken over from 50th RTR. At 0530 on the 5th 44th RTR moved north up the road to Vasto, with the aim of veering rights towards Capello, to support the East Surrey Regiment in their objective to take up a position just south of Capello. From there they were to send one squadron on to support a company of 2nd Bn KRRC to take the high ground at Monte Rocca.
It was decided that as 'B' Squadron, 44th RTR was leading, that they would join up with 2nd KRRC and as they set off across country they came under heavy shell fire, with one tank being blow into a small quarry and two more becoming stuck in the boggy ground of the valley. So it was decided to send 'C' Squadron, instead, but they took a longer but safer route along the main road. 'C' Squadron, 44th RTR succeeded into getting into a position just south of Capello, being followed by 'A' Squadron in reserve, while 'B' Squadron took up hull down positions to cover the town. During the morning 'C' Squadron knocked out two German MK IV tanks and shot up a pillbox which was believed to be an artillery observation post. In the afternoon Capello was taken by the infantry while 'A' and 'C' Squadrons moved across the valley into which they had been looking into all morning and occupied the high ground of Monte Rocca on the other side where 'A' Squadron linked up with 2nd KRRC. Here an enemy artillery battery which was thought to have been the one that shelled the regiment all morning was spotted and 'A' Squadron enjoyed a good shoot, which led to the battery moving quickly to a safer area. Now 'A' and 'C' Squadrons registered on the road running northwest from the River Sinello and shot at anything that dared to move along it, although when 'C' Squadron reached it later no knocked out vehicles were found. However, German prisoners of war did later report that nothing had been able to move along the road that afternoon and believed it was artillery shelling and not the tanks was controlled the area. 'A' Squadron now helped with the mopping up of the Monte Forca area, capturing a number of prisoners and also sending a troop to support infantry advancing on Monter Dorisio.
The next day 2nd KRRC helped, 44th RTR get a bridgehead across the River Sinello. But this was only successful by a full-scale attack to capture the village of Scerni, supported by three field gun regiments, after 676th Field Squadron RE was unable to prepare a crossing over the river. As 'A' Squadron advanced it came under fire from from four MK IVs hidden among some buildings and was not able to advance any further. 'C' Squadron took up positions to cover the buildings and also the woods to the south of Scerni, while 'B' Squadron moved up on their right, but the regiment now found itself in a bottleneck caused by the two valleys that converged on the town. The surrounding country was impassable to tanks, so there was no way of outflanking the German tanks on either side and any advance to the front was over open ground. This was an ides defensive position, which the Germans exploited perfectly.
As 'A' Squadron, edged forward one of its tanks was knocked out by an anti-tank gun and others were engaged by other anti-tank guns from different directions. Some SP guns were spotted on the ridge to the Squadron's left, but these were quickly knocked out and the anti-tank gun that had knocked out the 'A' Squadrons tanks was silenced, too. Deciding it was safer to venture forward on foot one troop commander walked forward and spotted a MK IV hidden under some trees. At midday No.5 Troop, of 'C' Squadron tried to move along the left of the road, but one of its tanks was knocked out, probably my the MK IV that had been in the trees earlier. While the battle continued the Adjutant decided to move his tank back slightly so he could concentrate on maintaining the rear link to Brigade without having to worry about the AP shells that were passing close to his turret. In do so he forgot to tell his driver to stop and the tank reversed into the living room of a farmhouse which was still occupied by the farmer and his family.
As it was now clear that 44th RTE could not move forward, so it was decided that a set piece attack would be used. With artillery support 2nd KRRC would send two companies forward, with one along the northern re-entrant and the other along the southern, while the tanks advanced along the road. Unfortunately, the attack started before the artillery had time to fully register on the enemy positions, so the barrage initially fell behind their lines, but this was soon corrected. As 'C' Squadron advanced it again came under heavy fire, with one tank being hit twice, but neither round penetrated the armour and 'A' Squadron lost another tank with two of the crew being killed. 'C' Squadron moved over to some trees by the re-entrant on the right, hoping to gain some cover from where they might be able to observe the enemy, while remaining hidden themselves. Unfortunately, the exhaust from their diesel Shermans gave them away and they were heavily mortared. By 1600 German MK IVs were see moving back up the road and 'A' Squadron sent some parting shots after them, to not apparent effect. At the end of the battle No.s 4 and 5 Troops from 'A' Squadron accompanied the infantry as the occupied the high ground nearby.
On 7th November, 1943, 44th RTR advances a few mile along the road to Casalbordino, and it was at first was reported that the Germans occupied the high ground to the west of the town. But as 'C' Squadron advanced with orders to take the high ground, they were met by infantry from 36th Brigade, who advised they already occupied the positions. So the regiment took up positions on the crest overlooking the River Osento. The next day, the 8th, orders came to move across the Osento and take the high ground around Paglieta and link up with the East Surreys. It was 'B' Squadron's turn to lead and the journey was completed without loss, but with some difficulty. The tanks had to move in line ahead along the river bed and then climb out where and when they could, but they reached the village and then 'B' Squadron set up defensive positions to support the infantry should the enemy counter attack.
From the high ground at Paglieta, 'B' Squadron had a superb view of the River Sangro and the enemy defensives on the other side. They were tempted to engage targets but the infantry asked them not too, pointing out that they were likely to have to remain there for several days and did not wish to encourage any unnecessary retaliation. It was now that for the next few days the rains fell, making movement and re-supply very difficult. It proved impossible to re-supply 'B' Squadron by mechanical means so 'Conroy's Column' consisting of three mules 'found' by Sgt Conroy helped greatly, who willing carried the ration up to the the outpost in the clouds that surrounded the hills. Many in the regiment felt sorry for then men of 'B' Squadron, who were so cut off, but latter when some officers went forward to check on the welfare of the Squadron they were found to be established in comfortable farmhouses with everything well organised and only too happy to be away from eyes of higher command!
On 16th November 1943, 46th RTR, much to the regret of the Brigade, received orders to rejoin 23rd Armoured Brigade, leaving their tanks behind. But at least this enabled the other three regiments to be made up to strength.
The Battle of the River Sangro
The German 65th Infantry Division held the main defensive position on the Li Colli Ridge with 26th Panzer and 90th Panzer Grenadier Divisions moving up in support. To add to the attacker problems the River Sangro was too deep to allow vehicles to ford across it. The British 78th Infantry Division had reached the river on 8th November and had established a bridgehead by the 19th. It was a wide, strongly flowing river and the northern defences were mined, wired and full of concrete pillboxes built by forced Italian labour. These ran westward from the sea to Fossalesia to the Li Colli Ridge and inland to Santa Maria and Mozzagrogna. On the German held side of the river the ground was flat with little or no cover. Therefore crossing the Sangro was to be a major operation.
While the preparations for the main assault were made the Brigade rested with 3rd CLY to the North of Termoli and 44th RTR spread out in squadron along the ridge that overlooked the River Orsente. As the days passed the weather grew colder and snow could be seen on the distant mountain tops. The plan was for 8th Indian Infantry Division to take Mozzagrogna in a night attack after the German defenders had been driven off the high ground on the northern side of the river. Then 4th Armoured Brigade and 78th Infantry Division to surprise the German defences by assaulting the Li Colli Ridge, although this was possibly too steep for armour to climb it. There would then be a set piece battle along ridge from Mozzagrogna north westwards towards Fossacesia and the sea, with 4th Armoured Brigade sweeping right flanking to the sea and opening up Route 16, to roll up the enemy on that flank. The attack was to be launched by the Brigade supporting the infantry of 38th (Irish) Brigade, which consisted of 6th Bn. The Royal Inniskilling Fusiliers, 2nd Bn. The London Irish Fusiliers and 1st Bn. The Royal Irish Fusiliers. It was to be made by successive waves of infantry and tanks passing through each other, behind a creeping barrage. Initially the infantry would be carried by the tanks and it was important that the infantry got used to working with the tanks. On 20th November the Brigade moved up over the River Osente to the Paglieta area ready for the advance over the River Sangro. 50th RTR lead and had problems crossing the River Osente with their tanks becoming stuck and unable to climb the far bank, which delayed 44th RTR and 3rd CLY, due to the heavy rain making the ground very soft. This delayed the Brigade while tanks were recovered from the mud and alternative routes sought. One such route allowed 44th RTR to move via Atessa to Paglieta, arriving there at 2100hrs on 22nd November, having lost seven ditched tanks on the way. Also by the 22nd 'A' Squadron of 3rd CLY had managed to move some tanks upto Torino and 'B' Squadron was able to send two troops over the River Osente to the River Sangro, but only two tanks actually made it across the latter owing to the state of the bridge.
For the next four days there was little or no movement for the Brigade and in fact the whole Army. A fortnight of detailed planning had gone into the assault, which was delayed by the heavy rain, causing the level of the River Sangro to rise and fall rapidly. The sappers had built three bridges that were often submerged and in danger of being swept away. Fortunately these four days (22nd to 26th November) were also fine and sunny, which helped to dry the ground out and also allowed the river level to decrease and so on the 26th the Brigade advances with 50th RTR in the lead, followed by 3rd CLY and then 44th RTR. However, 50th RTR had trouble with the crossing with several of the tanks getting stuck again. This meant that 3rd CLY and 44th RTR were not able to start crossing the bridges until 27th November with the former getting most of the remainder of 'B' Squadron across and the latter eleven tanks of 'C' Squadron over the bridges. The rest of both regiments started to follow with 3rd CLY leaguering under the escarpment, where it was shelled and 44th RTR getting RHQ and 'B' Squadron over the river, despite the last four of its tanks failing to get down the road to bridge due to the ground becoming soft again, which mean that its 'A' Squadron had to stay on the south side of the river for another night. The rest of 44th RTR completed the crossing on the 28th and joined the 3rd CLY under the escarpment awaiting the next phase of the battle. As the brigade waited no less than nine field regiments and three medium regiments bombarded the Mozzagrogna ridge.
While the 3rd CLY and 44th RTR were crossing the River Sangro men from 8th Indian Division, with great gallantry, battled for two days to reach Mozzagrogna, with the Gurkhas of 17th Indian Brigade taking the town once. However, craters and demolitions stopped 50th RTR reaching them, so when 26th Panzer Division counter-attacked at dawn on 28th November, 50th RTR and the Gurkhas were pushed back, with the latter suffering heavy casualties. For the first time Nebelwerfer multi-barrelled mortars were deployed by the German defenders.
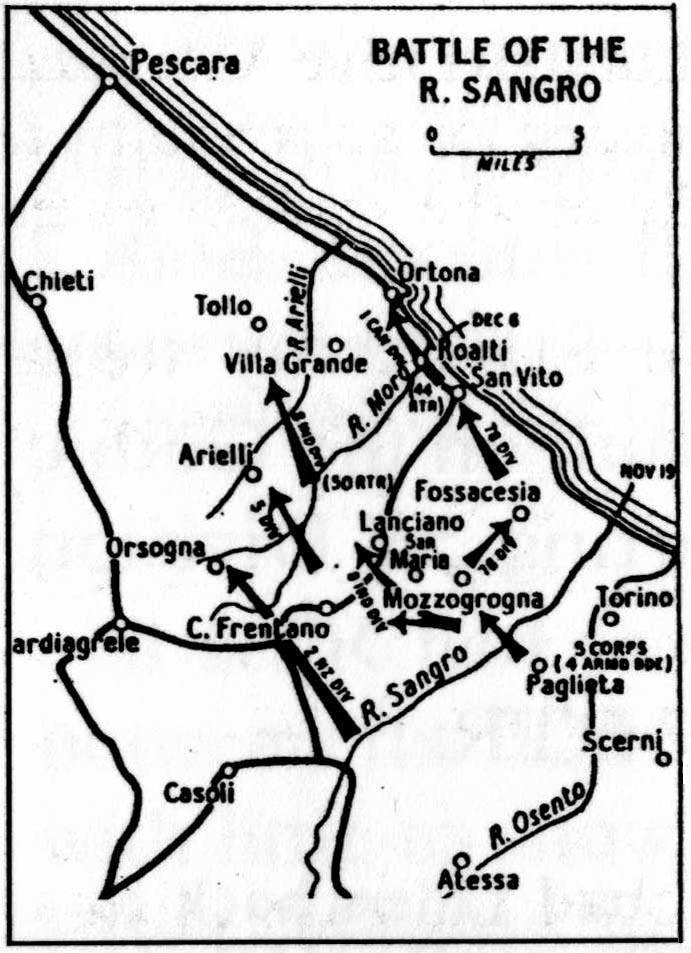
Earlier in November, 2nd Bn. KRRC, now under command of 8th Indian Division, had been ordered to occupy Monte Calvo on 15th November and after six very uncomfortable days there, they were ordered to attack and seize Casa Casone, a strongpoint across the river, on the edge of the high escarpment overlooking the Sangro, on the left of the escarpment held by 8th Indian Division. This was a strong and difficult position, well defended with dug-in positions, as the battalion advances The Casa stood out faintly in the moonlight and the escarpment looked as high and unclimbable as the cliffs of Dover. Even after 30 minutes concentrated bombardment from four RA regiments: though they failed in the first attempt, on 21st November, but they made no mistake the second time.
On 29th November 1943, behind
a formidable barrage the full-scale attack started at dawn, on Li Colli Ridge with
3rd CLY and
6th Bn. Royal Inniskilling Fusiliers (RIF) leading. 'B' Squadron of the CLY lead,
followed by RHQ, then 'A' and 'C' Squadrons, with their supporting infantry
companies behind them. 'B' Squadron lost seven tanks destroyed or immobilised in a minefield
among the olive groves. The sappers of 626th Field Squadron cleared the minefields
under fire, and the Sharpshooters persevered, with 'C' Squadron leading now to
the right and finding a way up to the Li Colli Ridge. The whole of these
activities took place among olive trees, and the sniping was very bad, but 'C'
Squadron then established a firm base on the top of the hill facing Fossaceisa
and then 'A' Squadron passed through and faced West, linking up with 'A' and 'C'
Companies of the RIF. 'A' Squadron then advanced straight over the enemy
defences and reached the outskirts of Santa Maria successfully. The most awkward
part of the attack was crossing a boggy field where 5 out of 12 attacking tanks
were stuck. On reaching Santa Maria the column halted and a patrol of one
Platoon of RIF and one troop went into the village, which was found to be
deserted except for 1 German officer and 23 ORs who were hiding in a cellar and
were duly taken prisoner. At last light the CLY were relieved by 8th
Bn, Argyll & Sutherland Highlanders (36th
Infantry Brigade
At dawn on 30th November, 44th RTR, led by 'C' Squadron, came up on the high ground on the left with the 2nd Bn. London Irish Rifles, with the intention of moving through 50th RTR and the Gurkhas and move towards Mozzagrogna. This advance was held up by some German MK IVs that 50th RTR were still dealing with, but when three of the four MK IVs tanks were knocked by the lead tank of 50th RTR, 44th RTR was able to move through Santa Maria and turn right on the main road to face Fossacesia. During this move 3rd CLY moved 'A' and 'C' Squadrons and one troop from 'B' Squadron to protect the 44th RTR on its left and to cut the Rocca to Fossacesia road.
The assault started at 1015hrs with an artillery barrage and all was in place for a set-piece battle, with 44th RTR and 3rd CLY on either side of the road and the infantry of 38th (Irish) Brigade ready to move forward behind the tanks. The advance proceeded better than planned as the opposition was far weaker than expected, with 'C' Squadron, 44th RTR at first taking the lead, which ten minutes later was the role of 'B' Squadron, who were in turn superseded by 'A' Squadron. Due to the undergrowth and the smoke from the barrage, visibility was poor and the tanks encountered little fire at first, but later 'A' Squadron overran three 75mm self-propelled guns and had to deal with German infantry in house and strongpoints along the road. Soon the leading Troop from 'A' Squadron reported that it had reached Fossacesia. Now that the barrage had moved to the other side of the town and then down towards the sea, 'B' Squadron moved to the high ground overlooking the town. The artillery were asked to concentrate on the north eastern edge of the town, but part if the barraged landed in Fossacesia, so it was not until this had been corrected that the infantry were able to occupy all of Fossacesia.
By now it was early afternoon and 'A' and B' Squadrons from 44th RTR moved through Fossacesia to assault the area between it and the sea. They carried the infantry on the backs of their tanks and met little opposition and by 16:00 hrs all enemy resistance around Fossacesia ceased and 800 POWs were taken. In addition to the loses suffered by 3rd CLY the previous day 44th RTR only lost one tank damaged on a mine, plus sixteen stuck in soft ground, which were all recovered later.
The entire River Sangro position had been captured and route 16 to the Adriatic had been cut. Elsewhere, 2nd Bn. KRRC had played their part under command of the Indian Division. It was a considerable victory. Lieutenant-General Allfrey commanding 5 Corps wrote to Brigadier Currie. 'The success was mainly due to the dash and fighting qualities of your Brigade.'
As the allies soon found Italy is a country of many, many rivers and each one had to crossed one at a time against determined defence. Ten miles beyond the River Sangro is the River Moro and the town of San Vito on the road to Pescara, which were planned to be the right-flank bastion of the Army's winter lines. 44th RTR led the advance on 1st December 1943 in support of 38th (Irish) Infantry Brigade, through precipitous terrain with hairpin bends and blown bridges. The village of Rocca was occupied with no problems, but after passing through it the advance was slowed by two blown bridges just as 'C' Squadron approached them. The Royal Engineers moved up to provide a way forward, but the terrain made this difficult and this caused considerable delays. For the next two days 44th RTR supported the infantry in their attempts to push the enemy off of the high ground to the North west, which each Squadron enjoying good shooting. In one incident as they advanced 'B' Squadron, 44th RTR, knocked out two MK IVs, one of which camouflaged as a haystack. The latter may well have gone unseen had it not started to move to the rear of a local house and then took up position behind a bushy tree. Fire was poured into the 'tree' and smoke began to rise from it and about an hour later the 'haystack' blew up!
On 3rd December a column under command Lt Col AA Cameron DSO MC, consisting of 3rd CLY, 98th Field Regt RA, 6th Royal Inniskillings and a section of RE moved off at 0530 to capture San Vito. The forward body, under command Major Woods MC, consisted of two troops of tanks, one Recce scout car leading, and representatives of other arms. The route was along the road through San Maria to a road junction and then North to San Vito. The column advanced rapidly until opposition was first met a mile short of the town. Here a brisk engagement was fought with German infantry, who retired leaving a number of dead and 30 prisoners were taken. The town had been defended by the old desert adversary, 90th Light Division and after the column entered San Vito where it was were heavily shelled and mortared. Brigadier John Currie and the CLY CO enjoyed themselves firing from one of the houses at the retreating enemy, while in the same action 3rd CLY 'captured' an Italian opera singer! The main Pescara road was found to be cratered and impassable, so after the infantry had cleared and taken over the town the 3rd CLY retired and leaguered nearby.
By 4th December the Germans appeared to have withdrawn from the high ground 44th RTR and 38th (Irish) Infantry Brigade had been working hard to take, for 44th RTR took up positions along the ride overlooking the River Moro, the next river to be crossed. 'A' and 'B' Squadrons moved up first and 'A' Squadron extended its line firstly into the villages of Frisa and later one troop was placed in the village. In doing so an enemy SP gun knocking out an RTR Sherman and was then knocked out itself. Having advance too far at one time another tank of 'A' Squadron started to reverse, but got stuck after being fired upon, so it was then used as a lookout tank as it commanded a excellent view of the river. Meanwhile, 'B' Squadron took up positions on the right flank to support 6th Bn. Royal Inniskilling Fusiliers (RIF). Two Troops were sent forward to deal will enemy strongpoints, but three tanks became stuck, so a joint tank and infantry attack was organised, which succeeded in causing the enemy to pull back, but failed to take prisoners. As the tanks withdrew to positions overlooking the river, they came under heavy shell and mortar fire and the three Shermans that had been ditched earlier now came under heavy MG and shellfire, killing two men and wounding three others.
On 5th December, the 2nd Canadian Brigade relieved the 38th (Irish) Infantry Brigade. The 2nd Bn. Princess Patricia's Canadian Light Infantry (PPCLI) were ordered to cross the river and the night of 5th/6th December and capture Rualti. where they were to be joined by 'C' Squadron of 44th RTR the next morning. Having moved off in the dark at 05:30 hrs following the Moro river until 'C' Squadron, 44th RTR, moved along the river bed until the reached the spot that had been reconnoitred the previous day and then started the steep climb up to Rualti, with the help of some Royal Engineers, who also had to clear the area of Teller mines By the time they reached the village of Rualti, only nine of the tanks made it, by mid-morning, just in time to help beat off an enemy counter-attack. Having halted at the far end of the village and fanned out in hull down positions facing west to watch and wait for an expected attack along the ridge from the south-west. The area was not good for tank fighting as the village was surrounded by olive groves and with the misty rain this could allow the enemy to get within 100 yards before being spotted. It was to be a battle of which tank could fire fastest.
Early in the afternoon the noise of tanks moving was reported from the left hand end of the defensive line, along the ridge. At about 1500hrs tanks and infantry were spotted about 800 yards away. A German Mark IV came into into view and Sgt Boyce fired about twenty rounds at it in a fierce few moments, probably it with the third shot before his tank was knocked out, but the RTR continue to MK IV with a few more rounds until it brewed up. Another MK IV then fired at the RTR tanks, knocking out two of them, before it too was knocked out, while another was knocked out at just 70 yards range at the same time immoblising the RTR Sherman that had hit it. Wherever movement was seen on the orchards, fire from the tanks and infantry was concentrated and the enemy returned fire with AP and HE rounds alike. On the other side of the river 'A' Squadron did what they could to support the defenders of Rualti, firing endless AP rounds into the area which was believed to contain a MK IV. They were rewarded by with seeing it 'brew up'.
'C' Squadron's support to the Canadians was my now having an effect on the enemy advance, as the German infantry had been halted 500 yards away by the Squadron's machine-gun fire. Once the attack by the German tanks had been checked the German infantry started to withdraw, followed soon afterwards by the German tanks. Once the danger of attack had past the CO of 'C' Squadron (Major Foster) contacted the CO of the PPCLI to make arrangements for the defence of the town that night. Then as darkness fell the Squadron withdrew to positions at the top of the track they had climbed that morning, leaving one tank on guard with a platoon of infantry.
The night passed without incident, except for a few false alarms and the noise of enemy motor transport in the distance. At first light on the 7th, 'C' Squadron took up the positions from the previous day. There was periodic heavy shelling doing the day and by the afternoon it was learn that the Royal West Kents (RWKs)from 8th Indian Division were to relieve the PPCLI and that night the CO of the Royal West Kents came over to make contact with Major Foster and 'C' Squadron. It was planned that again one guard tank with a platoon from the PPCLI would be in places as per the previous night and during the nights the Canadians were to be believed by a platoon from the RWKs. The Canadians were supposed to show the RWKs the guard tank and to instruct them to make contact with its commander Lt. Joe Rogers. Alas the Canadians forgot to do so and the RWKs thought the 44th RTR tank was a derelict. At about 0300 the Germans mounted a stealthy night attack and put down heavy mortar fire on sectors of the Rualti front, with the main attack coming from the south west again. Lt. Rogers awoke to the sound of firing at close range and German voices only a few yards away. Despite being in place to provide anti-tank support the lone RTR tank opened fire with all its guns and its fire combined with that of the infantry was very demoralising on the German infantry who withdrew. In the morning a number of dead and wounded Germans were found outside the tank, along with two beehive tank destroyers, a Teller mine and two prepared demolitions charges with pull igniters.
The morning of 8th December 1943, passed without incident, but by now 'C' Squadron was reduced to six operational tanks. Five of them had been hit and the sixth only had one engined working. During the afternoon very heavy artillery fire was directed only the enemy positions 1000 yards from the village, for about an hour. When this stopped the Germans returned fire onto the village with 'stonks' of about 15 minutes each which continued until 1730 hrs. Only two tanks were damaged with one suffering damage to the suspension and the other a pierced radiator. That night the supply mule train also brought a message of congratulations from the Army Commander to all troops in Rualti. Much to the pleasure of the commander of the guard tank, the night also passed off reasonably quietly.
The 9th December was a reasonably quite day, which allowed Cpl. Cress from 'C' Squadrons fitters, along with L/Cpl. Neal and Tpr. Orme to move forward to see what they could do to recover the three ditched tanks. Cpl. Cress had pressed hard to be allowed to do this and he and the others worked day and night in an area subjected to heavy shell and mortar fire, but by 16th December all except one tank that was deemed beyond recovery were back with the Squadron again, along with a capture MK IV. which Cpl. Cress and his team had rendered fit again. It was later noted that "Cpl. Cress had shown exemplary leadership and determination throughout".
During the night of 9th/10th December the guard tank, commanded by Capt. Wilson, had a noisy and exacting time. At last light a German patrol was spotted moving down the valley towards the River Moro and at about 1800 hrs a mortar bombardment commenced on the village, and in particular the area around the guard tank. Machine gun fire then appeared to come from all angles, but after some initial confusion it was decided this was a diversion to detract attention from the enemy patrol. By 0300 the fire had quietened down, but by 0400 it intensified for a short while. At one time during the night Capt. Wilson thought a counter-attack was forming up so with the help of the artillery observation office he brought down fire on the suspected enemy within two minutes.
On the morning of 10th December, the noise of tanks was heard climbing up to the village and shortly afterwards a Squadron of 50th RTR, with two companies of Punjabi infantry appeared. Later in the afternoon carriers and anti-tank guns reinforced the infantry further. 'C' Squadron had helped the Canadians and Royal West Kents defend Rualti against determined counter-attacks which had continued non-stop until relief on 10th December by 50th RTR. The squadron were to win four medals for their actions at Rualti, with Major Foster and Capt. Wilson receiving Military Crosses and Sgts. Boyce and Tirbutt receiving Military Medals.
Although, its job in Rualti was done 'C' Squadron remained there until 16th December when it moved back across the River Moro to Treglia, taking the German MK IV with it. Alas while climbing a hill on the way to San Vito the German tank seized up and it had to be abandoned.
It was now 'A' Squadron of 44th RTR turn to take part in the fighting and it was intended that under the command of 1st Canadian Tank Brigade, it should form a mobile reserve ready to support the Canadians who were then engaged in heavy fighting between Rualti and the sea. So before dawn on 14th December 'A' Squadron crossed the River Moro and made contact with The Carlton and York Regiment from 3rd Canadian Infantry Brigade, but they were told they would not be required that day, so the Squadron spent the rest of the day and the following night across the river behind the Canadians line. The following day 'A' Squadron moved forward, with No.3 Troop in the lead. The aim was to make contact with the infantry who had established a bridgehead just across the stream ahead. When No.3 Troop arrived and found no infantry, they assumed that they must be further forward and started to cross the stream and to fan out on the other side. The lead tank came under fire from a German MK IV Special hidden in some houses about 150 yards away across the road. The tank was hit three times in quick succession and having been wounded in the head the driver baled out, but the tank continued to advance driverless, so the rest of the crew had to leap out too. The tank eventually stopped just before the road, having been hit again. The Troop commander then engaged and hit the MK IV, while the other tank engaged and silenced a 75mm SPG, which was later engaged again and blew up.
As it was obvious that no bridgehead existed No.3 Troop moved back across the stream and took up positions next to a farmhouse where they found a company of The Seaforth Highlanders of Canada. The company commander informed the OC of 'A' Squadron that the original plan to advance had been temporarily postponed and that his men's role was to deny the enemy the use of the Orsogna to Ortona road that was in front of his positions. This the infantry did with the aide of three artillery regiments, whose FOOs were all occupying the same farmhouse, a move that was to prove unwise later.
From the amount of small arms fire coming from the north and the south east, it soon became clear the the position occupied by the infantry and tanks was on a salient. One troop commander carried out a reconnaissance on foot to the south only to find enemy infantry entrenched there, so he quickly returned to his unit. No.5 Troop of 'A' Squadron was sent out with a patrol of infantry to make a further reconnaissance, but almost immediately the infantry became pinned down by machine gun fire. It was with some difficulty they were extracted by support from the tanks. During the night enemy vehicles were heard moving along the road, but as had been planned by the Forward Observation Officer from 98th Field Regt, RA, heavy and accurate fire was brought down on the road. He did this my simply repeating the codeword SOS over the radio link. After this no more movement of vehicles was heard, but the voices and noise of German working parties was audible.
At dawn on 16th December 'A' Squadron opened out again and a plan was made for the Squadron to move forward to the road and recover the 'runaway' tank, if possible. No.5 Troop lead, with No.4 Troop behind it and they managed to spot a 75mm gun and a MK IV, both of which were knocked out, the crew of the later seen baling out. Also hits were registered on a tracked vehicle mounting a gun of some kind. At this point No.5 Troop came under heavy fire and an AP shell went straight through the farmhouse containing the infantry HQ, Squadron HQ and the three FOOs and damaged the suspension on the Squadron Commanders tank parked behind. This round was followed almost immediately by a high velocity HE shell which came through virtually the same hole was the first. This caused the FOOs and their teams, plus the infantry HQ to evacuate the farmhouse very quickly. No.4 and No.5 Troops were recalled and occupied hull down positions and at last light the squadron took up close leaguer before replenishing after dark.
When the tanks took up their position on the morning of the 17th it was clear that the enemy had withdrawn from the position to the south and immediate west, but the squadron was still subjected to accurate 150 mm artillery faire at irregular intervals. A patrol of infantry was sent out supported by No.2 and No.3 Troops in an attempt to recover the 'runaway' tank, but upon inspection it was discovered that the batteries were flat and the interior had been damaged by a German grenade. It was now known that Divisional Artillery were about to range on the area in preparation for an attack the next day, so all the troops withdrew. During the morning representatives of 11th Canadian Tank Regiment, along with 1st Canadian Divisional artillery arrived at the farmhouse, in order to inspect the ground over which the attack was to be made.
It is not known if the arrival of the extra troops was spotted, but at 1430 a particularly heavy bombardment by 150mm guns fell on the farmhouse area, which killed Major F.E. Whitaker, OC 'A' Squadron, and wounded four other men. Once of these L/Cpl Heyden displayed considerable gallantry in assisting the dressing of the other wounded, concealing his own wound until this was completed. All the killed or wounded had been sheltering from the barrage either beneath their tanks or just behind them. Later 44th RTR RHQ sent Major R.G. Martin MC to take command of the squadron, along with replacements for the wounded. There was more heavy shelling during the night, but no further casualties.
The barrage started at 0800 on 18th December and at 0830 the infantry supported by a squadron on 12th Canadian Tank Regiment passed through 'A' Squadron's positions to start the attack. In the afternoon the CO of 11th Canadian Tank Regiment gave permission for 'A' Squadron to withdraw and express thanks and appreciation for the work they had done. As the Squadron withdrew it was subjected to two barrages from Nebelwerfers which did not cause any damage. At 1830, having passed through San Leonardo and San Vito, the squadron reached the village of Martelli, about two miles south of Treglia, where the rest of 44th RTR we in residence, having moved there on 16th December. This ended 44th RTR's fighting on Italian soil.
While 44th RTR was engaged at Rualti, 3rd CLY was ordered to cross the River Moro on 6th December and provide support to the The Seaforth Highlanders of Canada and The Hastings and Prince Edward Regiment from 1st Canadian Infantry Division. 'B' Squadron were sent off to the right flank to try and cross the river in, but were unsuccessful, while RHQ, 'A' and 'C' Squadrons intended to cross near the demolished bridge. The Regiment deployed along the ridge and one troop of 'C' Squadron moved down the road to attempt the crossing, but failed, all 3 tanks being bogged. Another troop was ordered to make the attempt, but they also were bogged. The tanks in the ice-cold muddy River Moro were subjected to severe shelling and mortar fire. The Regiment remained in observation all day, supporting the forward infantry by fire, concentrated in torrential rain around the village of San Leonardo. Here they suffered casualties from German heavy artillery until they were relieved on 7th December and withdrew to Treglia.
3rd CLY had come out of the line and was carrying out maintenance and recovering tanks by 8th December, but 'A' Squadron (under the command of Major Woods) was lent to the 8th Indian Division, under command of 50th RTR for a five-day campaign from 13th December. By 15th December 1943, the situation across the River Moro in many ways resembled that which had obtained on the River Sangro. The 8th Indian Division, to the south of 1st Canadian Division, had succeeded in making a bridgehead about 1½ miles deep and 2½ miles wide, consisting of various battalion localities from the Royal West Kents (RWKs) in Rualti on the North (right), to the Mahrattas on the South (left). The flanks of the bridgehead were rendered more or less secure by deep wadis on each side. Parallel to the river on the high ground to the West lay the Ortona lateral road, which was held and freely used by the Germans to maintain positions commanding the low ground within the bridgehead and the river crossings. This position also provided observation on the road along the escarpment out of the Eastern side of the river, along which all traffic had to proceed. A railway also ran alongside the Ortona lateral. 50th RTR were in leaguer in the central (rearward) sector of the bridgehead, with squadrons and troops farmed out to the various infantry localities. Until now all attempts to reach the Ortona lateral road had been unsuccessful.
At first light the Frontier Force Rifles, with 'C' Squadron, 50th RTR, in support, tried to cut the lateral in the central sector, but this attack had little success. 'A' Squadron of 50th RTR was in the right sector in support to the Royal Fusiliers and the Gurkhas. The latter managed to get a very small party across the road, but this forces was reduced to a strength the equivalent of two companies. 'B' Squadron, 50th RTR, with only four tanks, was leaguered in the left sector, well back and behind the Mahrattas, who were on a high ridge running parallel to the lateral at a distance of about 600 yards.
The plan for the next day was to attack from the Mahrattas ridge and seize the hamlet known as Pt.232 on the Ortona lateral, RWKs were to carry out the attack supported by 'A' Squadron 3rd CLY. Accordingly at 1430 the Colonel of the RWK made his reconnaissance, while OC 'B' Squadron 50th RTR was asked to report by 1530 if it was possible to get tanks up to the starting point on Mahrattas hill. He had already given his opinion that this was impossible, but was ordered to make a further recce. The recce was carried out in a drizzle and the party, which actually got within 400 yards of the objective, before being heavily mortared. There was not time to pick a tank run and a general estimate of the possibilities was all that could be attempted. The ground was heavy plough and boggy and the final ascent to the Mahratta ridge was very steep. There were three continuous banks which appeared to constitute an anti-tank obstacle. There were a number of vineyards with concrete poles and low wires such as get entangled in bogie wheels. It was necessary to turn left on a steep gradient and proceed along the edge of the ridge, to the start point. Lt Col J Sleeman (CO of 50th RTR) was informed by OC 'B' Squadron, that the chance of success was only about 30%. Based in this information it was decided to make the attempt with the proviso that the RWKs would retire if 'A' Squadron, 3rd CLY, had not made the start point by first light. At his evening orders the CO of the RWKs stated that he had been ordered "not to risk the lives of the Royal West Kents" by his Divisional Commander. He wanted 'A' Squadron to start getting up the Mahratta ridge at midnight but on consultation with Col Sleeman, Major Woods decided to start the climb at 0400 on 16th December. The attack was to go in under barrage at 0500, first light was at 0700. During the night a No.38 radio set belonging to the infantry was netted in overnight to one of 3rd CLY's tanks and worked well throughout the operation.
Reveille on 16th December was was at 0330 and the 'A' Squadron, 3rd CLY, was on the move by 0400. It was bright moonlight with a cloudless sky. After entering the field below Mahratta ridge the Squadron Commander (Major Wood) and Lt. Dunn walked ahead of the Squadron picking a zigzag route through the numerous obstacles, while Sgt. Mutton, with wire cutters, clipped a way through the vineyards. This was a most exhausting process and by 0500 only five tanks had reached the high ground, and these were still hampered by wire. The noise of the barrage could now be heard and soon the infantry reported that they were on their objective, and a fire could be seen from the direction of Pt.232. There was a lot of sniping and wild shooting but all the tanks (15 in total) finally arrived at the starting point and were joined by an artillery FOO in a Sherman. Another unforeseen obstacle was met, for the leading troop hit a 'wadi' between the start point and the objective. One of the troop commanders then made a wide cast to the left and by first light positions were reached according to plan.
Here there were 3 Companies of infantry were astride the rail and road at Pt.232, so No.3 troop gave protection to the North (right) and No.1 Troop to the South. The balance of the infantry and tanks, with the infantry CO and the CLY Squadron Commander, remained on the starting point giving cover by fire. Swinging left down the road, No.1 Troop saw some movement in a house and engaged. They knocked out and set on fire two Mark IV Special tanks and destroyed a long barrelled 75mm anti-tank gun and its tractor. A platoon of infantry were then sent up to comb the houses, finding a motor cycle and motor cycle combination damaged, and a half-tracked personnel carrier and 2.8cm tapered barrel anti-tank gun abandoned. The count of prisoners was now 12, rising to 36 by noon and about 60 by last light. Elsewhere a short barrelled Mark IV tank and a Mark III tank with flame thrower were abandoned intact in the hamlet by the crews.
The tank commanded by Sgt Mutton became bogged but continued to engage, while the one commanded by Cpl Allison became bogged and received direct hits from mortar fire which damaged the 75mm and wounded one of the crew, who was evacuated. The position was consolidated and a firm base established astride the lateral. Four tanks which had been fitted with hooks in Sicily were now sent back down the hill and towed up the infantry 6 pdr anti-tank guns, while a troop was sent at 1300 with a platoon of infantry to discover whether the village of Consalvo, about a mile across the road, was still held. After going a short distance, the leading tank was knocked out and set on fire by a 75mm, whether from a tank or a gun was never known. Of the crew, one was killed and two wounded.
The Squadron leaguered on Mahratta ridge and one tank, which had been left in leaguer that morning with mechanical trouble, came up after moonrise. This tank assisted by another the helped out with the replenishment of ammunition only, as the leaguer was unapproachable by wheeled vehicles. No.3 Troop commanded by Lt Henningham remained in Pt.232 in support of Royal West Kents (RWKs) overnight.
On the morning of the 17th the Squadron, less No.3 Troop, supported 3/15 Punjabis in an attack on a cross-roads one mile South of Pt.232. The attack went in at 0445, and the objective was found to be recently abandoned. The Squadron arrived on the objective by first light. A pause was now made until midday, when an attack was made by two companies and two troops on Consalvo. The country was very thickly treed and the Shermans were unable to give effective support to the infantry, who became pinned and began to suffer casualties. Communications worked badly as the Punjabis operators spoke Urdu. A third company of infantry was sent around the right with a troop in support but made no better progress. The mortar and HE fire were severe, and the FOOs could get no observation. Firing also developed from the left flank which was quite open and after it had began to rain the going stared to get very bad. The commanding officer of 3/15 Punjabis decided to call off the attack and make a firm base around the cross-roads. All orders for the withdrawal had to be issued of 'A' Squadron net, as the infantry by now had no communications. The Squadron, including No.3 Troop, leaguered behind Mahratta ridge near the road. Three bogged tanks (and one battle casualty) were left out in Forward Defence Lines.
The Squadron broke leaguer at 0545 on 18th December and was back in battle positions by first light. There was little activity but periodic harassing fire. In the afternoon the Punjabis entered Consalvo, which had been abandoned, without aid from the tanks. No.3 Troop then supported RWKs into a hamlet a mile to the North. The Squadron now was ordered to be withdrawn and at last light returned to its leaguer area of 15th December to wait until 2130, at which time it was to start re-crossing the River Moro bridge. At 2100 the Squadron was ordered to return to the Oranto lateral and to go North, through the Canadian's lines, to San Leonardo and to cross by the bridge over which the Regiment had fought on 6th and 7th December. The march up to the lateral was led by the Fitter's 15cwt and was made in pitch darkness along a narrow winding road. One tank from the Squadron and a 'B' Squadron tank from 50th RTR were ditched. On reaching the lateral about midnight at Pt.198 the Squadron was halted and ordered to go no further until first light, as the Canadians had not been warned of their approach. While the Squadron was waiting Lt Henningham went on in a scout car to recce the route to San Leonardo.
The Squadron moved on at 0500 on the 19th, with one tank suffering from severe mechanical trouble and with the tank leading the column having its gun traversed rear, to indicate it was not hostile to the Canadians. Lt Henningham was met at San Leonardo and the whole party passed through the Canadian lines in safety and crossed the River Moro before stopping to brew up tea. At San Vito the Canadian police refused to allow the tanks to use the bridge and half the Squadron was made to use a diversion, but when it was explained that a tank had come to grief on this route on a previous occasion, the Canadians relented. All tanks reached leaguer safely except for those left the other side of the River Moro.
For his gallantry when troop attacked Point 232 through vineyards and knocked out two 'special' Mk IVs on 16th December 1944, Lt. Ted Dunn, was awarded the MC.
Christmas was now at hand and for many of the brigade this was their third away from home. As the Brigade was out of the line in reserve under 5 Corps command, foraging parties went out 'obtaining' food and wine. On the 25th December traditional meals were served as usual by the officers and NCOs, to the Troopers of all the regiments. Major Oliver Woods was Santa Claus for the Sharpshooters, Corporal Lloyd Ponting trained a choir which sang carols round the various units, and the Reverend Victor Pike, the Assistant Chaplain General, held a drumhead service.
Having been in action until 18th December, 44th RTR, but spent Christmas in Martelli near Treglia. Some of 44th RTR journeyed back to the Foggia area, where only three months earlier turkeys had been plentiful and cheap, but upon arrival they found that the presence of the American Air Force had inflated the prices. A piano was found in Lanciano and despite mud, cold and heavy rain the cooks excelled themselves, but it was noted that Christmas passed very happily, but very, very cold with biting wind.
At the end of December Brigadier Currie left the brigade to go back to the UK, to become BRAC to the 1st Canadian Army. He was succeeded by Brigadier H. J. B. Cracroft, who had previously commanded 12th RTR.
By now the rumours were correct and a return to the UK was confirmed. The Sharpshooters handed their tanks over to 50th RTR, who left the brigade to rejoin 23rd Armoured Brigade near Naples, and by stages 3rd CLY, 44th RTR and the rest of brigade, moved back to Taranto, while Lt-Col Cameron flew back to England to prepare for their arrival at Worthing.
The Sharpshooters sailed on 27th January 1944 on board MV Tegelberg and reached the Clyde on 8th February. The 44 RTR arrived in Taranto on 12th January and three days later they held a memorial service for the growing numbers killed in action in Africa, then Sicily and now Italy. On 25th January 1944, they celebrated their last night on Italian soil and then sailed for home on the SS Ranchi. The 2nd Battalion KRRC, with 31 officers and 639 Other Ranks, embarked from Naples on HM Almanzora and docked at Glasgow on 9th February 1944, which was two years since they encountered Rommel at Agedabia. A band greeted the brigade on arrival and there were free tea, cigarettes, buns and newspapers. The Royal Scots Greys had rejoined the brigade before it left Italy and the 'Black Rats' stepped ashore at the King George V Dock and went by train south to Worthing to join I Corps, settled into their billets and went off on leave.
Now they were back in the UK, it soon became known that General Montgomery had specially asked for 4th Armoured Brigade to be part of the invasion team of the Northern European mainland. This was obviously an honour, but a dangerous one, too!
| Back | Main | Site Map | |
| Engagements in the Desert | Engagements 1942 | Engagements 1944 | Engagements 1945 |
| 4th Armoured Brigades Engagements Page | 4th Armoured Brigade Artefacts and other information | ||